So listen up, my friend, because today we’re diving into the world of iron-on patches. You know those little pieces of fabric that can transform any plain piece of clothing into a masterpiece? Yeah, those. Iron-on patches are not just accessories; they’re a way to express yourself, tell a story, or even just add a pop of color to your wardrobe. And the best part? They’re super easy to apply! Stick around, and I’ll show you exactly how to iron on patches like a pro.
Now, before we dive into the nitty-gritty details, let me tell you why iron-on patches are having a moment right now. From fashion bloggers to DIY enthusiasts, everyone’s jumping on this trend. Whether you’re customizing a denim jacket, adding flair to a backpack, or revamping an old pair of jeans, iron-on patches are your go-to solution. Plus, they’re affordable, which means you can experiment without breaking the bank.
But here’s the thing: not everyone knows how to iron on patches correctly. It’s easy to mess it up if you don’t follow the right steps. That’s where this guide comes in. By the end of this article, you’ll be a patch-ironing wizard, ready to tackle any project that comes your way. So grab your iron, your patches, and let’s get started!
Read also:Bill Gatzimos Wikipedia
Table of Contents:
- What Are Iron-On Patches?
- Why Use Iron-On Patches?
- Tools You’ll Need
- Step-by-Step Guide to Iron On Patches
- Common Mistakes to Avoid
- Tips for Best Results
- Variations of Iron-On Patches
- Customizing Your Own Patches
- Where to Buy Iron-On Patches
- FAQ About Iron-On Patches
What Are Iron-On Patches?
Let’s start with the basics, shall we? Iron-on patches are fabric pieces with heat-activated adhesive on the back. When you apply heat using an iron, the adhesive melts, bonding the patch to your chosen fabric. These patches come in all shapes, sizes, and designs, making them incredibly versatile for customization projects.
Back in the day, iron-on patches were mostly used for repairing torn clothes or adding logos to uniforms. But these days, they’ve evolved into a fashion statement. From cute animal designs to intricate patterns, there’s something for everyone. And the best part? You don’t need any sewing skills to use them!
History of Iron-On Patches
Iron-on patches have been around for decades, but their popularity has surged in recent years. Originally, they were used by the military to add insignias to uniforms. Over time, they made their way into mainstream fashion, becoming a staple for DIY enthusiasts and fashionistas alike.
Today, iron-on patches are a symbol of creativity and self-expression. They’re a quick and easy way to personalize your belongings, whether it’s a jacket, bag, or hat. And with so many designs available, the possibilities are endless!
Why Use Iron-On Patches?
Now, you might be wondering, “Why should I bother with iron-on patches when I could just sew them on?” Great question! Here’s the thing: iron-on patches offer several advantages that make them a better choice for many people.
Read also:Boku To Misaki
- No Sewing Required: If you’re not handy with a needle and thread, iron-on patches are a lifesaver. All you need is an iron and a few minutes of your time.
- Quick and Easy: Unlike sewing, which can take hours, ironing on a patch takes just a few minutes. Perfect for those last-minute projects!
- Versatile: Iron-on patches come in a wide range of designs, so you can find something that matches your style or mood.
- Affordable: You don’t have to spend a fortune to get high-quality patches. They’re budget-friendly and perfect for experimenting with different looks.
So whether you’re a fashion lover, a DIY enthusiast, or just someone looking to add a personal touch to their belongings, iron-on patches are worth considering.
Tools You’ll Need
Before you start ironing on patches, make sure you have all the necessary tools. Here’s a quick list to help you prepare:
- Iron-On Patches: Obviously, you’ll need the patches themselves. Choose designs that suit your project.
- Iron: A regular household iron will do the trick. Just make sure it’s clean and free of any residue.
- Towel or Cloth: Place this under the item you’re patching to protect your surfaces.
- Protective Sheet: Some patches come with a protective sheet to prevent the adhesive from sticking to your iron. If yours doesn’t, you can use a piece of parchment paper.
- Scissors: If your patch needs trimming, a good pair of scissors will come in handy.
With these tools in hand, you’re ready to tackle your project. Now let’s move on to the fun part!
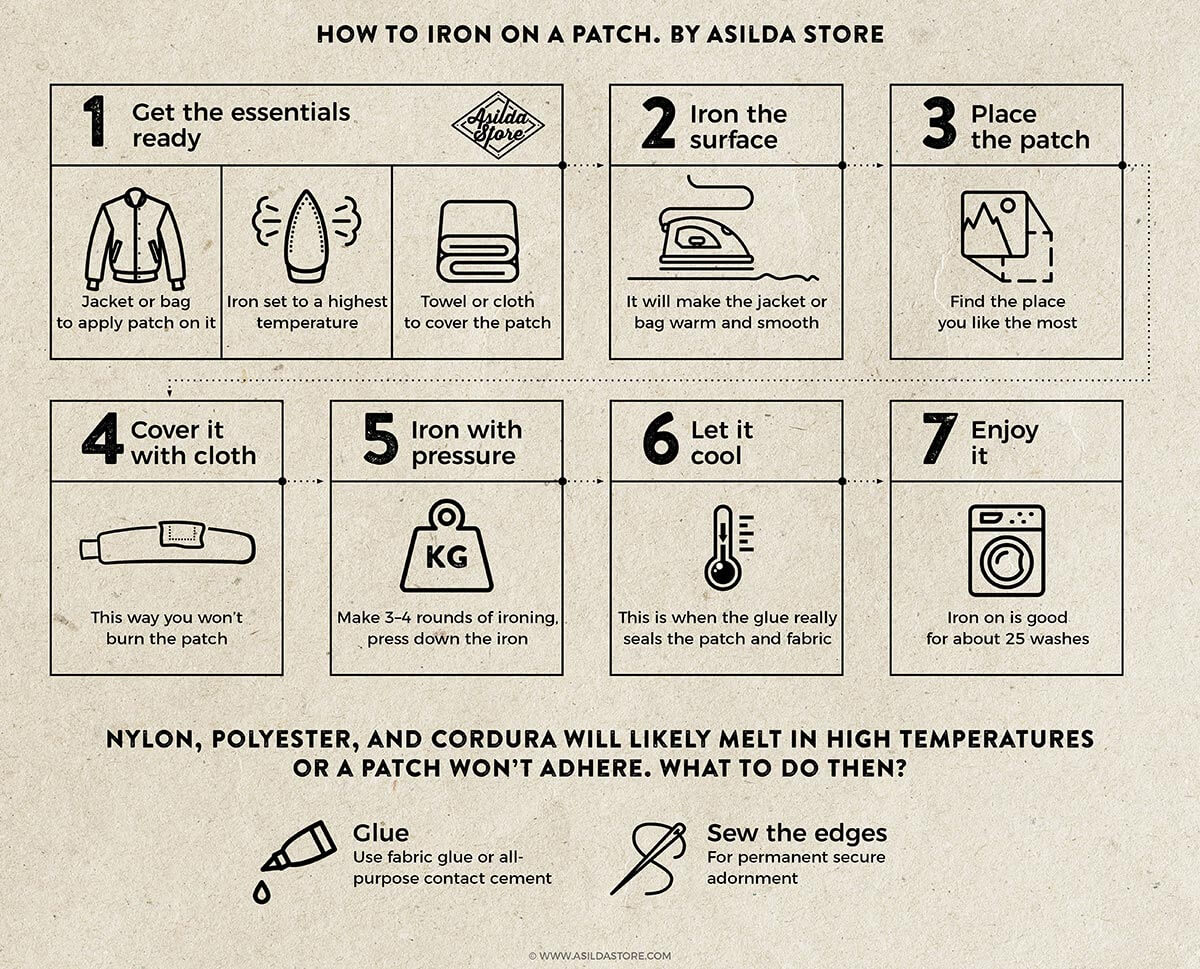
Step-by-Step Guide to Iron On Patches
Alright, let’s get down to business. Here’s a step-by-step guide to help you iron on patches like a pro:
Step 1: Choose Your Patch
Pick out the patch you want to use. Make sure it fits the area you’re planning to patch and complements the fabric.
Step 2: Prepare Your Surface
Place your item on a flat, heat-resistant surface. Put a towel or cloth underneath to protect your surfaces from heat damage.
Step 3: Position the Patch
Decide where you want the patch to go and position it carefully. Once you apply heat, it’ll be difficult to move it, so take your time with this step.
Step 4: Iron It On
Set your iron to the recommended temperature (usually medium heat). Place the protective sheet over the patch and press the iron down firmly for about 20-30 seconds. Make sure to cover the entire patch evenly.
Step 5: Let It Cool
Once you’ve ironed the patch, let it cool completely. This will help the adhesive set and ensure a strong bond.
And that’s it! Your patch should now be securely attached to your fabric. Easy, right?
Common Mistakes to Avoid
While ironing on patches is pretty straightforward, there are a few common mistakes that can ruin your project. Here’s what to watch out for:
- Using the Wrong Temperature: Too much heat can damage the patch or the fabric, while too little won’t activate the adhesive properly.
- Not Pressing Long Enough: If you don’t press the iron down long enough, the patch might not stick properly.
- Forgetting the Protective Sheet: Skipping this step can lead to adhesive residue on your iron, which is a pain to clean.
- Moving the Patch After Applying Heat: Once you’ve ironed the patch, resist the urge to move it around. This can weaken the bond.
By avoiding these mistakes, you’ll ensure a successful patching experience every time.
Tips for Best Results
Want to take your patching game to the next level? Here are some tips to help you achieve the best results:
- Pre-Wash Your Fabric: This removes any dirt or oils that could interfere with the adhesive.
- Use a Pressing Cloth: A thin cloth between the patch and the iron can prevent scorching.
- Apply Even Pressure: Make sure to press the iron down evenly across the patch for a strong bond.
- Let It Cool Before Handling: Patience is key here. Let the patch cool completely before touching it.
With these tips in mind, you’ll be able to create stunning projects that last.
Variations of Iron-On Patches
Not all iron-on patches are created equal. Here are some variations you might come across:
Fabric Patches
These are the most common type of iron-on patches. They’re made from various fabrics and come in a wide range of designs.
Vinyl Patches
Vinyl patches are more durable and weather-resistant, making them ideal for outdoor gear like backpacks and jackets.
Reflective Patches
These patches glow in the dark, adding a fun and functional element to your projects.
Each type of patch has its own unique qualities, so choose the one that best suits your needs.
Customizing Your Own Patches
If you’re feeling extra creative, why not design your own patches? There are plenty of online services that allow you to upload your designs and get custom patches made. This is a great option if you want something truly unique.
When designing your own patches, keep the following tips in mind:
- Keep It Simple: Complex designs can be difficult to reproduce accurately.
- Choose Durable Materials: Make sure the materials you choose can withstand the heat of an iron.
- Test Before Committing: Order a sample patch to ensure the design and quality meet your expectations.
Custom patches are a great way to express your individuality and stand out from the crowd.
Where to Buy Iron-On Patches
There are plenty of places to buy iron-on patches, both online and in-store. Here are a few options to consider:
- Online Retailers: Websites like Etsy, Amazon, and eBay offer a wide selection of patches at various price points.
- Craft Stores: Local craft stores often carry a selection of iron-on patches, especially during peak crafting seasons.
- Specialty Shops: If you’re looking for unique or themed patches, specialty shops might be your best bet.
Just make sure to read reviews and check the return policy before making a purchase.
FAQ About Iron-On Patches
Got questions? Here are some frequently asked questions about iron-on patches:
Can I Wash Items with Iron-On Patches?
Yes, but be cautious. Hand wash or use a gentle cycle to avoid damaging the patch. Avoid using bleach or harsh detergents.
How Long Do Iron-On Patches Last?
With proper care, iron-on patches can last for years. The durability depends on the quality of the patch and how it’s cared for.
Can I Use an Iron-On Patch on Any Fabric?
Not all fabrics are suitable for iron-on patches. Avoid using them on delicate fabrics like silk or satin, as the heat can damage the material.
And that’s a wrap! You now have all the information you need to start ironing on patches like a pro. So what are you waiting for? Grab your tools and get creative!
Kesimpulan
Iron-on patches are a fun and easy way to add personality to your belongings. By following the steps outlined in this guide, you can achieve professional-looking results without any sewing skills. Remember to choose the right tools, avoid common mistakes, and take your time with each step.
Don’t forget to share your projects with us in the comments below! We’d love to see what you create. And if you found this article helpful, feel free to share it with your friends. Happy patching, and see you in the next one!