Alright folks, let’s get down to business. If you're here because you want to learn how to draw a boy, then you're in the right place. Drawing can seem intimidating at first, but trust me, it’s like riding a bike—once you get the hang of it, you’ll wonder why you were scared in the first place. Whether you're a total beginner or just looking to refine your skills, this guide is packed with tips, tricks, and techniques to help you create awesome drawings of boys. So grab your pencil, eraser, and some paper, and let's dive right in.
Now, before we jump into the nitty-gritty details, let me set the stage for you. Drawing a boy isn’t just about sketching out random lines. It’s about understanding proportions, anatomy, and expression. You need to think about how the body moves, how the face looks, and how all the little details come together to create a realistic—or even stylized—representation of a person. Don’t worry if it sounds complicated; we’ll break it down step by step so it feels manageable.
Here’s the deal: by the end of this guide, you’ll have the confidence to tackle any drawing project involving boys. We’ll cover everything from basic shapes to shading techniques, and I’ll even throw in some fun facts and pro tips along the way. Ready to unleash your inner artist? Let’s go!
Read also:Matt Olthoff Resignation
Why Learning How to Draw a Boy is Important
Let’s face it, drawing people is one of the most rewarding things you can do as an artist. But why focus on drawing boys specifically? Well, for starters, boys come in all shapes and sizes, which makes them super versatile subjects. You could be drawing a young kid playing soccer, a teenage gamer, or even a grown man with a rugged beard. Each of these scenarios requires different techniques and approaches, making it a fantastic way to improve your skills across the board.
Another reason is that drawing boys helps you understand human anatomy better. Unlike objects or landscapes, humans are dynamic and complex. By learning how to draw a boy, you’ll gain insight into how muscles work, how joints move, and how facial features differ between genders. This knowledge will translate into other areas of your art, whether you’re drawing superheroes, anime characters, or realistic portraits.
Plus, let’s not forget the emotional aspect. Boys often express emotions differently than girls, so capturing those nuances in your drawings adds depth and authenticity to your work. Think about it: a smirk, a furrowed brow, or a genuine smile can tell a whole story without needing words. That’s the power of art!
Understanding the Basics of Drawing
Before we dive into the specifics of drawing a boy, let’s talk about the fundamentals of drawing in general. These principles apply no matter what you’re drawing, so it’s worth taking the time to master them. Here are a few key points to keep in mind:
- Proportion: This refers to the size relationship between different parts of the body. For example, the head should generally be about 1/8th the size of the entire body.
- Perspective: Perspective helps create depth and dimension in your drawings. It’s especially important when drawing figures in motion or from different angles.
- Light and Shadow: Understanding how light interacts with objects is crucial for adding realism to your drawings. Pay attention to where the light source is coming from and how it affects shadows and highlights.
- Gesture: Gesture drawing focuses on capturing movement and energy. It’s a great way to practice quick sketches and improve your ability to convey action in your art.
These basics might sound simple, but they form the foundation of all great drawings. Once you’ve got them down, you’ll find that drawing anything becomes much easier.
Breaking Down the Anatomy of a Boy
Alright, now let’s zoom in on the specifics of drawing a boy. The first thing to understand is that boys differ from girls in several key ways. For instance:
Read also:Billie Eilish Xxx
Body Structure
Boys tend to have broader shoulders, narrower hips, and more angular features overall. Their muscle structure is usually more defined, especially as they grow older. When drawing a boy, pay attention to these differences to make your artwork look authentic.
Facial Features
The face is another area where boys differ significantly from girls. Male faces typically have:
- Stronger jawlines
- Broader foreheads
- Thicker eyebrows
- Smaller lips
Of course, these are general guidelines, and every individual is unique. But keeping these characteristics in mind will help you create more believable boyish faces.
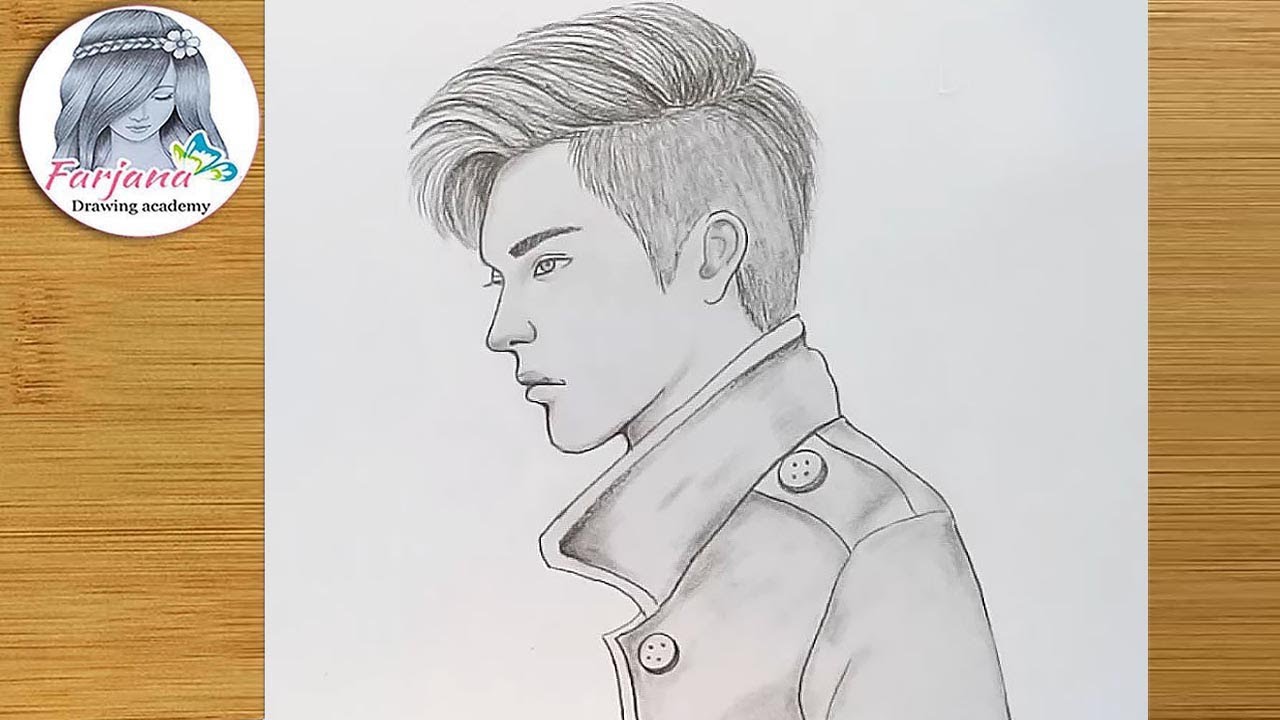
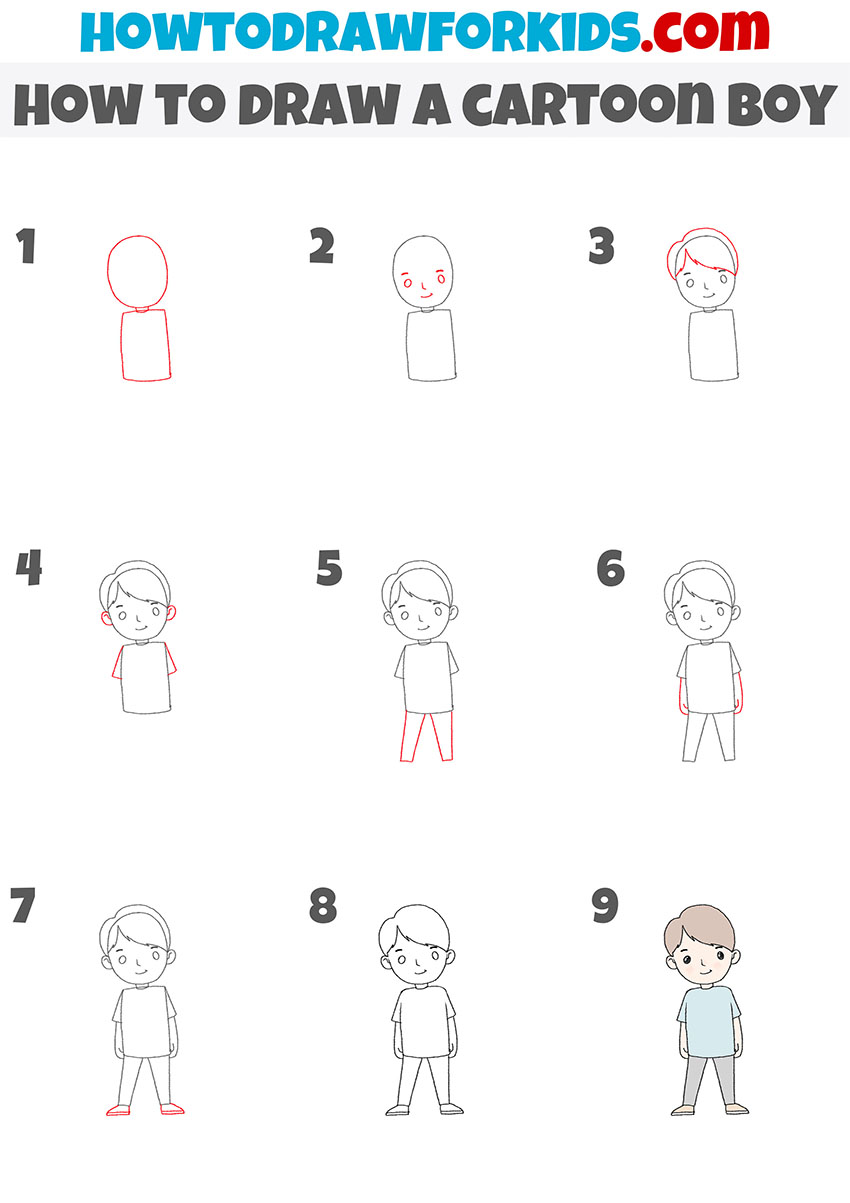
Step-by-Step Guide to Drawing a Boy
Now that we’ve covered the basics, let’s walk through a step-by-step process for drawing a boy. This method works for beginners and experienced artists alike, so don’t be afraid to follow along.
Step 1: Start with Basic Shapes
Begin by sketching out basic shapes to establish the overall structure of your drawing. For a standing boy, you might start with an oval for the head, a rectangle for the torso, and smaller rectangles for the arms and legs. Don’t worry about perfection at this stage—these shapes are just guidelines.
Step 2: Add Proportions
Once you’ve got your basic shapes, it’s time to refine the proportions. Use a ruler or your eye to ensure that everything is in the right place. Remember, the head should be about one-eighth the size of the body, and the arms should reach down to the hips.
Step 3: Define the Features
Now it’s time to add the details. Start with the face, working from the top down. Place the eyes roughly halfway down the head, followed by the nose and mouth. Then move on to the hair, ears, and any other distinguishing features.
Step 4: Refine the Outline
Once you’ve added all the features, go back and clean up your lines. Erase any unnecessary guidelines and make sure your outline is smooth and even. This is where your drawing starts to take shape!
Step 5: Add Shading and Texture
Finally, add shading and texture to give your drawing depth and dimension. Use cross-hatching, stippling, or whatever technique feels right for you. Don’t forget to consider the light source when adding shadows!
Common Mistakes to Avoid
Even the best artists make mistakes sometimes, but there are a few common pitfalls to watch out for when learning how to draw a boy. Here are a few things to avoid:
- Ignoring Proportions: It’s easy to get carried away with details and forget about proportions. Always double-check that everything is in the right place before moving on.
- Overworking the Face: The face is important, but don’t spend so much time on it that you neglect the rest of the body. Balance is key.
- Using Too Much Pressure: Pressing too hard with your pencil can make it difficult to erase mistakes. Start light and build up gradually.
By keeping these tips in mind, you’ll be able to avoid common mistakes and create better drawings overall.
Tools and Materials You’ll Need
Having the right tools can make a huge difference in your drawing experience. Here’s what you’ll need to get started:
- Pencils: A set of graphite pencils ranging from 2H to 6B is ideal for shading and detail work.
- Eraser: A kneaded eraser is perfect for lifting lines without damaging the paper.
- Paper: Choose a good quality drawing paper that can handle erasing and shading.
- Blending Tools: Tortillons or blending stumps can help smooth out your shading.
Investing in quality materials will make your drawings look better and make the process more enjoyable.
Advanced Techniques for Drawing Boys
Once you’ve mastered the basics, it’s time to take your skills to the next level. Here are a few advanced techniques to try:
Gesture Drawing
Gesture drawing involves capturing the essence of a pose in just a few quick strokes. It’s a great way to practice movement and energy in your drawings. Set a timer for 30 seconds to a minute and sketch as much as you can in that time. You’ll be amazed at how much you can improve with regular practice.
Shading Techniques
Shading is what gives your drawings depth and realism. Experiment with different techniques like cross-hatching, stippling, and blending to find what works best for you. Don’t be afraid to mix and match methods to create interesting textures.
Getting Feedback and Improving
No matter how skilled you are, there’s always room for improvement. One of the best ways to grow as an artist is to seek feedback from others. Join online art communities, attend workshops, or simply ask friends and family for their opinions. Constructive criticism can help you identify areas where you need to improve and celebrate what you’re doing well.
Conclusion
So there you have it, folks—a comprehensive guide to how to draw a boy. Whether you’re a complete beginner or a seasoned artist, I hope this article has given you the tools and inspiration you need to create amazing drawings. Remember, practice makes perfect, so don’t be discouraged if your first few attempts don’t turn out exactly how you hoped. Keep at it, and you’ll see improvement over time.
Now it’s your turn! Grab your pencils and start drawing. Share your creations with the world, and don’t forget to come back for more tips and tricks. Happy drawing, and see you in the next article!
Table of Contents