Learning how to draw a rose can seem like a daunting task, but it’s actually easier than you think. Roses have a timeless beauty that makes them a favorite subject for artists of all skill levels. Whether you’re just starting out or looking to refine your technique, this guide will help you create stunning rose drawings step by step.
There’s something magical about roses. They’re not just flowers—they’re symbols of love, passion, and elegance. And when you learn how to draw a rose, you’re capturing that essence on paper. Whether you’re sketching for fun or aiming to impress, mastering this skill can open up a world of creativity.
So grab your pencils, erasers, and a clean sheet of paper because we’re about to dive into the art of rose drawing. By the end of this guide, you’ll be well on your way to creating beautiful rose illustrations that will leave anyone in awe.
Read also:Videmms
Why Learning How to Draw a Rose is Worth It
Before we jump into the nitty-gritty of drawing roses, let’s talk about why this skill is worth your time. Roses are more than just pretty flowers; they’re versatile and meaningful. They appear in countless forms of art, from paintings to tattoos, and knowing how to draw them can elevate your artistic abilities to the next level.
Here are a few reasons why learning how to draw a rose is such a great idea:
- Roses are universally loved, making them a perfect subject for gifts or personal projects.
- They come in various shapes and sizes, giving you endless possibilities for creativity.
- Mastering roses can improve your understanding of shading, texture, and form.
- It’s a skill that never goes out of style!
Plus, who doesn’t love the feeling of accomplishment that comes with creating something beautiful? Let’s get started!
Understanding the Basics of Rose Anatomy
To draw a rose well, it helps to understand its structure. Just like humans have bones and muscles, roses have petals, sepals, and stems. Knowing these parts will make your drawings look more realistic and natural.
The Key Components of a Rose
Here’s a quick breakdown of the main parts of a rose:
- Petals: These are the most prominent part of the rose and come in layers. They give the flower its iconic shape.
- Sepals: These are the green leaf-like structures at the base of the petals. They protect the bud as it grows.
- Stem: The stem holds everything together and provides support. It’s also where thorns are often found.
- Leaves: Don’t forget the leaves! They add depth and balance to your drawing.
By understanding these components, you’ll be able to create more lifelike rose drawings. Now, let’s move on to the fun part—actually drawing one!
Read also:Camilla Araujo Xxx Videos
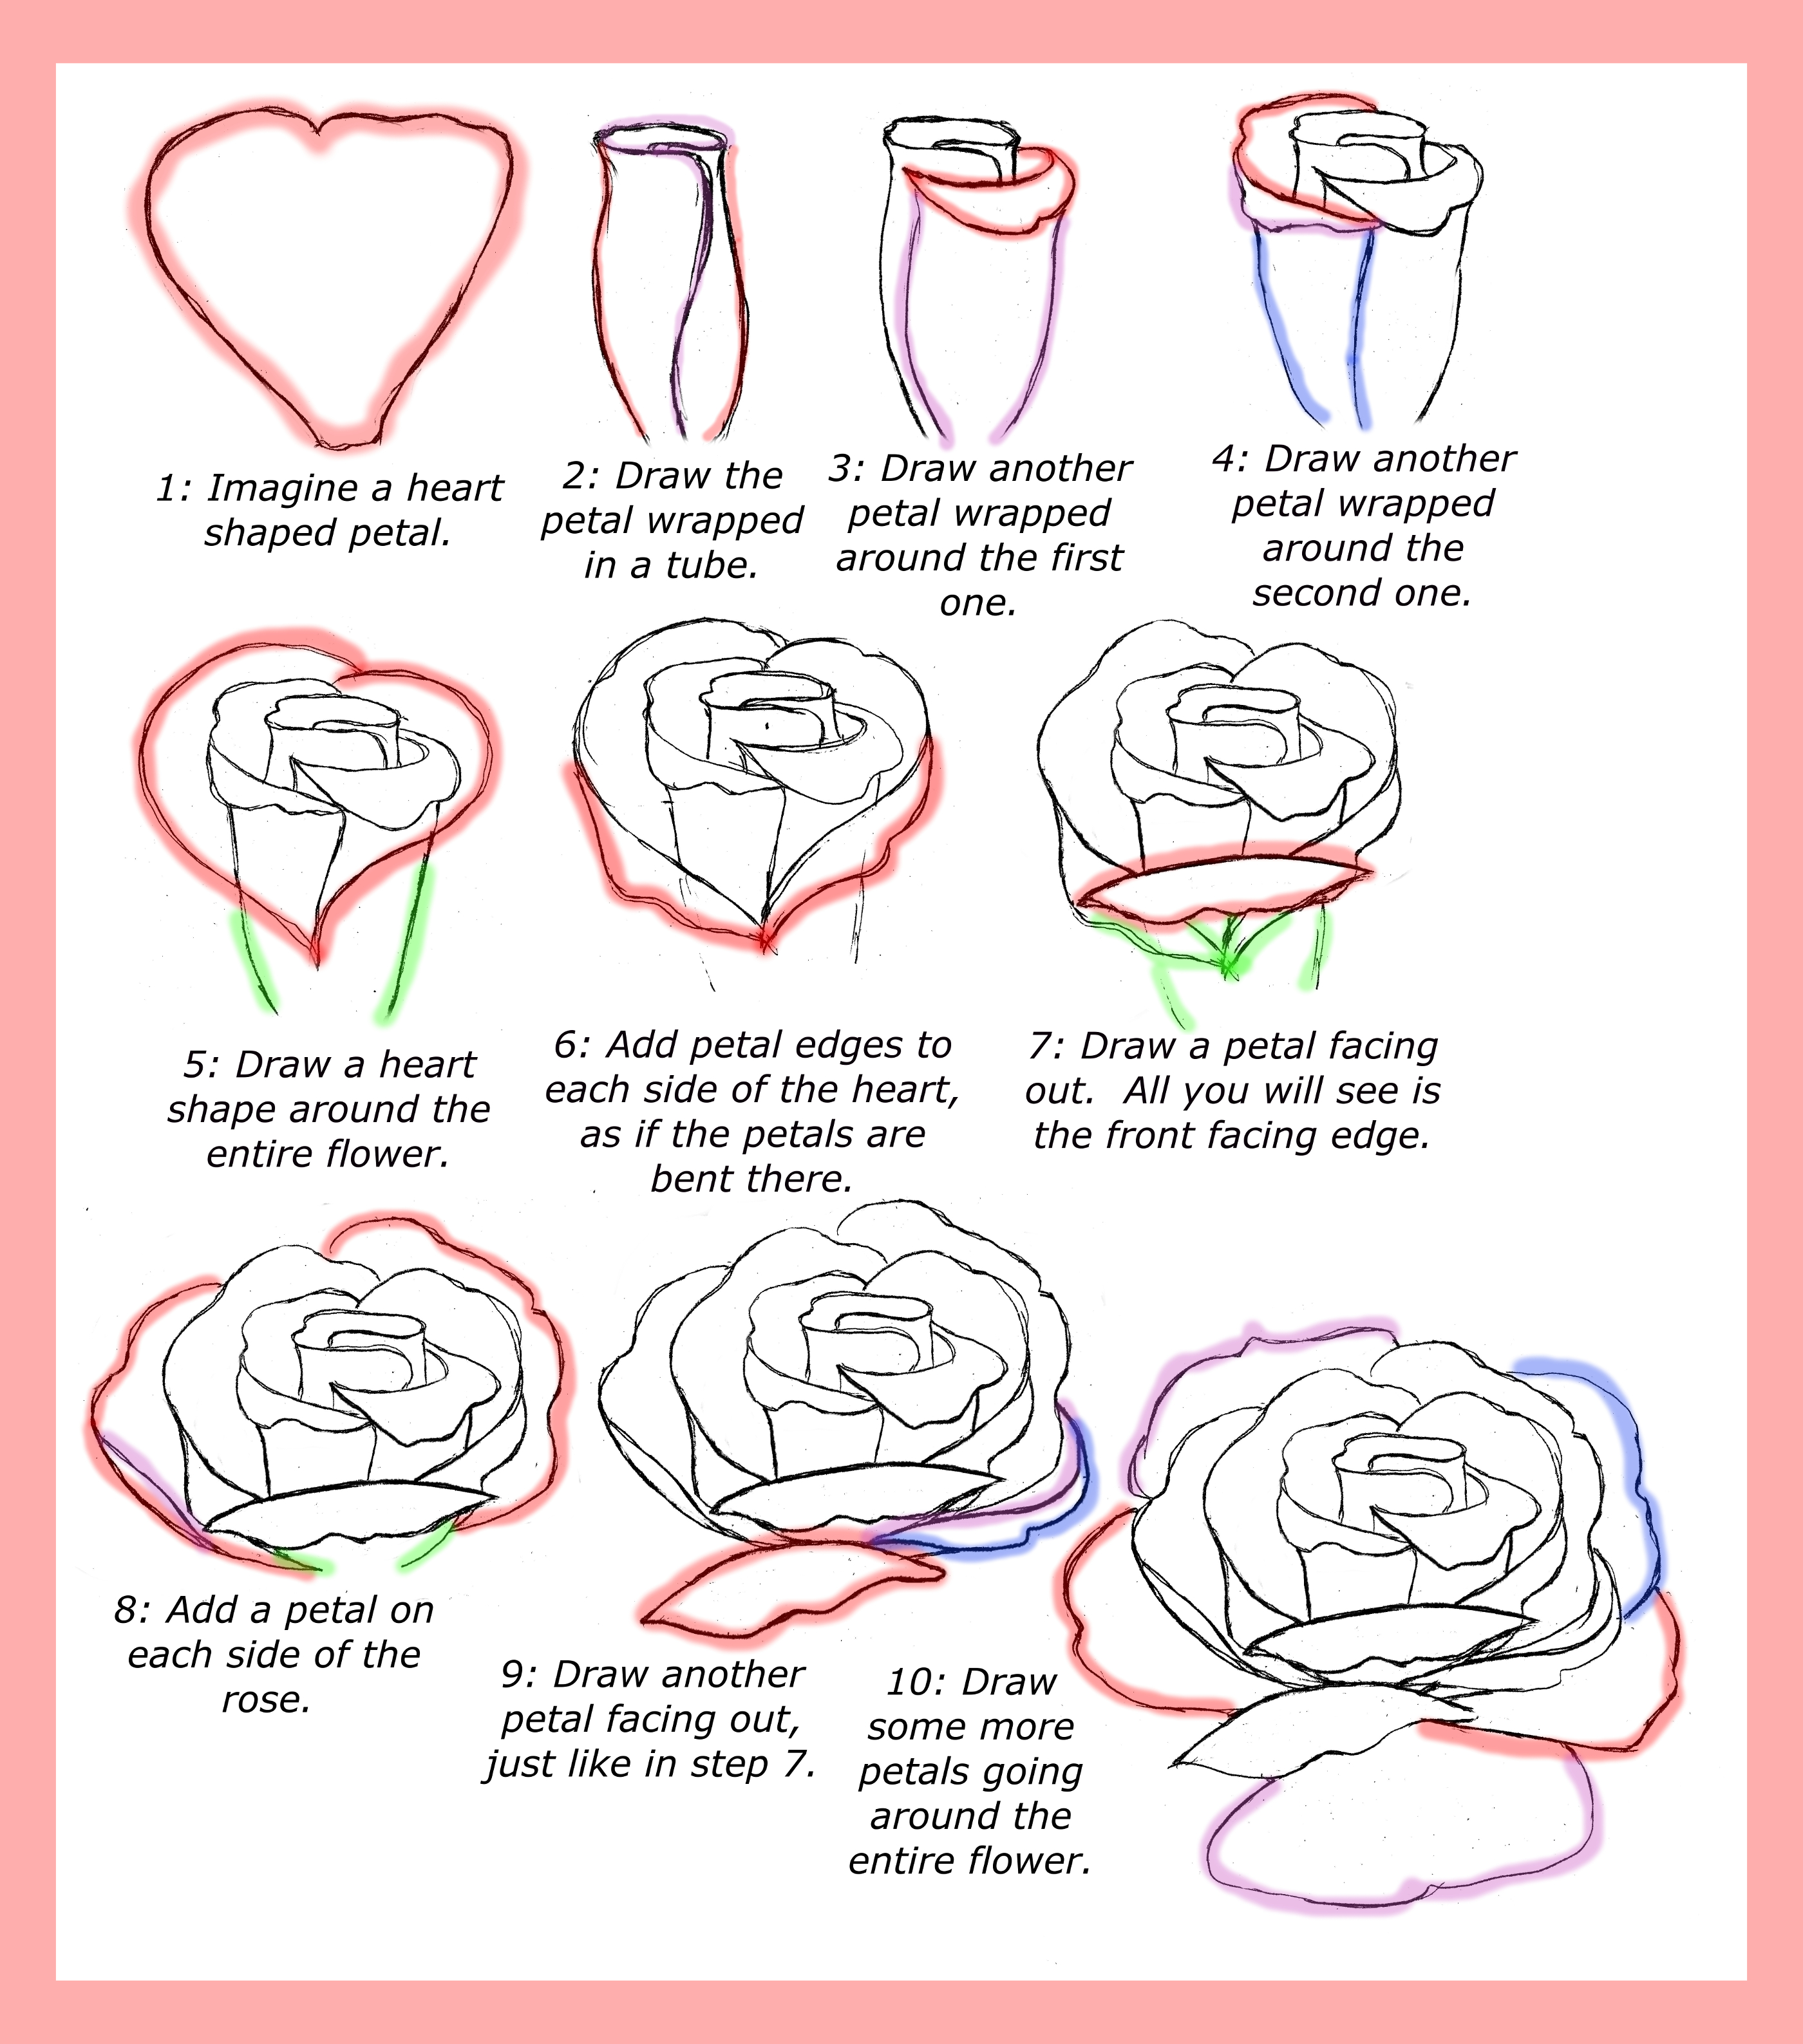
Step-by-Step Guide on How to Draw a Rose
Ready to start? Follow these simple steps, and you’ll have a beautiful rose drawing in no time. Take it slow, and don’t worry if your first attempt isn’t perfect. Practice makes perfect!
Step 1: Sketch the Basic Shape
Begin by lightly sketching a small oval or circle. This will serve as the center of your rose. Think of it as the starting point for all those gorgeous petals.
Pro tip: Use a light touch so you can easily erase any mistakes later.
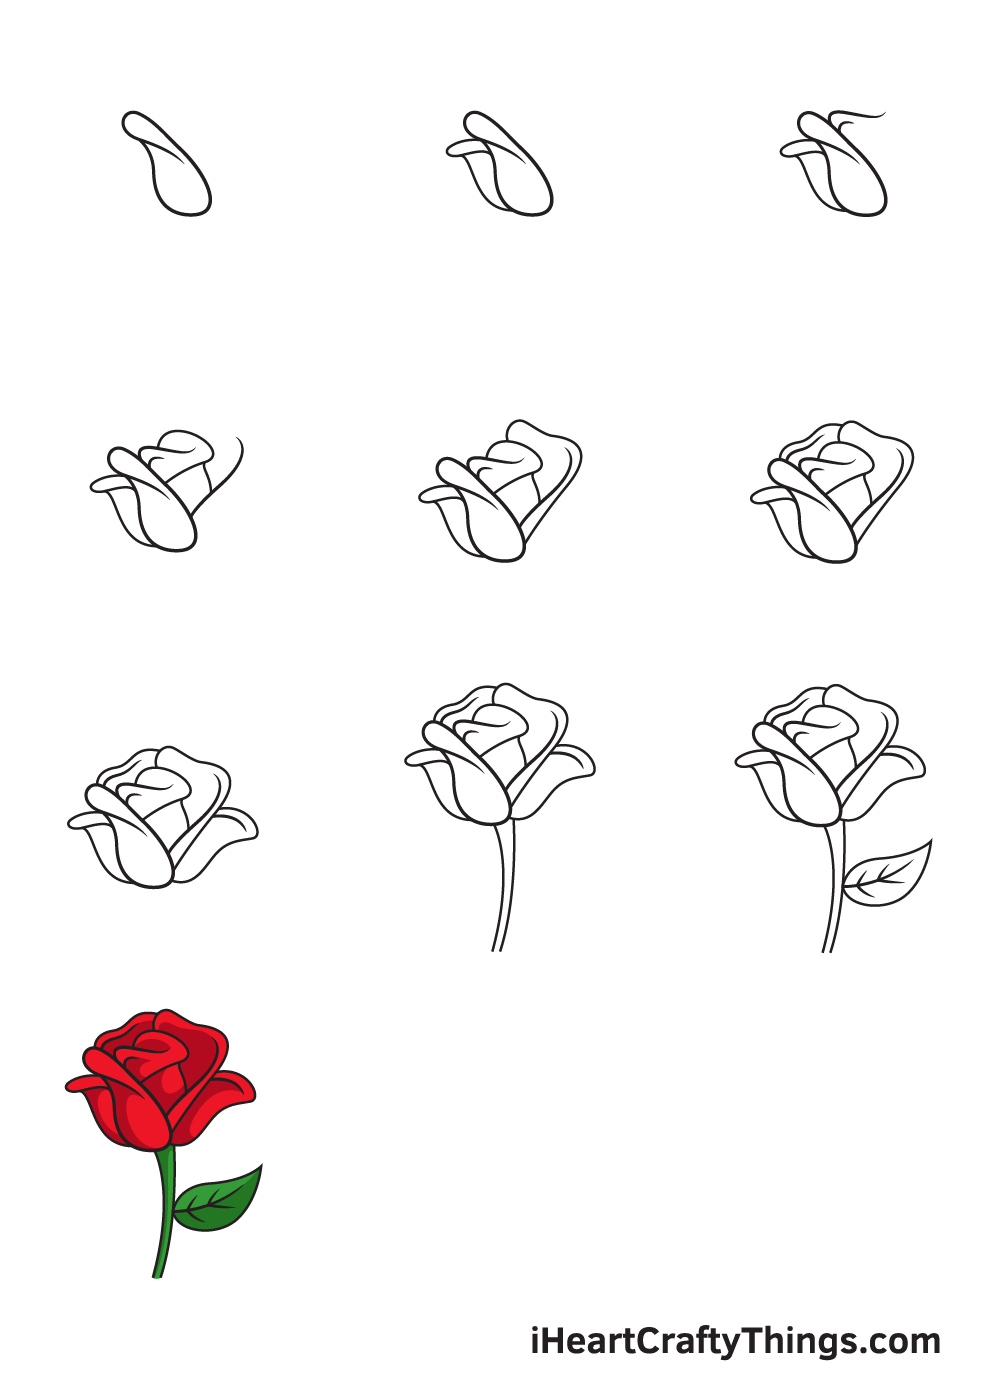
Step 2: Add the Outer Petals
Now, draw a few curved lines around the oval to represent the outer petals. Remember, petals aren’t perfectly symmetrical—they overlap and vary in size. Keep your lines loose and organic.
Step 3: Layer the Petals
Building on the previous step, add more layers of petals. Each layer should be slightly larger than the one before it. This creates the illusion of depth and makes your rose look more realistic.
Step 4: Define the Sepals
At the base of the petals, sketch a few small, pointed shapes to represent the sepals. These little details go a long way in adding authenticity to your drawing.
Step 5: Draw the Stem and Leaves
Extend a straight line downward from the base of the rose to create the stem. Then, add a few leaves along the stem. Make sure the leaves have a slight curve to give them a natural look.
Step 6: Add Details and Shading
Once you’ve outlined your rose, it’s time to bring it to life with details and shading. Pay attention to the curves of the petals and the way light interacts with their surfaces. Use cross-hatching or stippling techniques to add texture and depth.
Tips and Tricks for Drawing Stunning Roses
Now that you know the basic steps, here are some tips to take your rose drawings to the next level:
- Study real roses or photos to get a better understanding of their shapes and textures.
- Experiment with different shading techniques to find what works best for you.
- Practice drawing roses in various stages of bloom—from tight buds to fully open flowers.
- Don’t be afraid to make mistakes. Every artist learns through trial and error.
Remember, the key to becoming a great artist is consistency. The more you practice, the better you’ll get.
Common Mistakes to Avoid When Drawing Roses
Even the best artists make mistakes sometimes. Here are a few common pitfalls to watch out for:
- Overlapping petals too uniformly—real roses are messy and unpredictable.
- Forgetting to add the sepals and leaves—they’re essential for realism.
- Using too much pressure when sketching—this can make your lines look stiff and unnatural.
By being mindful of these mistakes, you’ll be able to create more polished and professional-looking rose drawings.
Exploring Different Styles of Rose Drawings
One of the coolest things about drawing roses is that there’s no one “right” way to do it. You can experiment with different styles to express your unique artistic voice. Here are a few ideas to try:
Realistic Style
This style focuses on capturing every detail of the rose, from the delicate curves of the petals to the tiny thorns on the stem. It’s perfect for artists who love precision and detail.
Cartoonish Style
If you want to have fun with your drawings, try creating a cartoonish rose. Exaggerate certain features, like the size of the petals or the shape of the leaves, for a whimsical effect.
Abstract Style
Abstract rose drawings break away from traditional forms and focus on shapes, colors, and textures. This style is great for artists who enjoy exploring new ways of expressing themselves.
Tools and Materials You’ll Need
Having the right tools can make all the difference when it comes to drawing roses. Here’s a list of essentials:
- Pencils (various grades, such as HB, 2B, and 4B)
- Eraser (a kneaded eraser works best for detailed work)
- Sketchbook or drawing paper
- Blending tools (optional, for smoothing out shading)
Investing in quality materials will help you achieve better results and make the drawing process more enjoyable.
Inspiration and References for Drawing Roses
Sometimes, the best way to improve your skills is by looking at the work of others. Here are a few sources of inspiration:
- Art books featuring botanical illustrations
- Online galleries showcasing rose drawings
- Photographs of real roses in different environments
Studying the work of other artists can give you new ideas and techniques to incorporate into your own drawings.
Final Thoughts on How to Draw a Rose
Learning how to draw a rose is a rewarding journey that combines creativity and skill. By following the steps outlined in this guide and practicing regularly, you’ll soon be creating stunning rose illustrations that capture the beauty of these iconic flowers.
So, what are you waiting for? Grab your pencils and start drawing! And don’t forget to share your creations with others. Who knows? You might inspire someone else to pick up a pencil and join you on this artistic adventure.
Table of Contents
- Why Learning How to Draw a Rose is Worth It
- Understanding the Basics of Rose Anatomy
- Step-by-Step Guide on How to Draw a Rose
- Tips and Tricks for Drawing Stunning Roses
- Common Mistakes to Avoid When Drawing Roses
- Exploring Different Styles of Rose Drawings
- Tools and Materials You’ll Need
- Inspiration and References for Drawing Roses
- Final Thoughts on How to Draw a Rose
Happy drawing, and remember—every masterpiece starts with a single stroke!