So, you wanna learn how to draw a book? Great idea, my friend! Whether you're an aspiring artist or just looking to doodle something cool during your free time, drawing a book is a fantastic way to practice your skills. Books are full of depth, texture, and detail, making them a perfect subject for artists at any level. Let's dive in and get those creative juices flowing! oh and by the way this is gonna be fun, trust me.
Now, before we jump into the nitty-gritty of how to draw a book, let’s talk about why it’s such a great exercise. Drawing a book isn’t just about sketching lines on paper. It’s about capturing the essence of something that holds stories, knowledge, and emotions. Think about it—books are magical objects, and drawing one can help you understand their structure, form, and even their symbolic meaning.
So whether you're sketching a simple notebook or a massive leather-bound tome, you're about to embark on a journey that’ll make your art skills sharper than ever. Stick around, because we’ve got all the tips, tricks, and techniques you need to create a masterpiece. Are you ready? Let’s go!
Read also:Billie Eilish Xxx
Here’s a quick table of contents to help you navigate through this guide:
The Art of Drawing Books: A Brief History
Books have been around for centuries, and artists have been drawing them just as long. Think about it—every ancient manuscript, every illuminated page, and every leather-bound novel has been depicted by someone who appreciated the beauty of books. From Renaissance artists to modern illustrators, the book has always been a popular subject.
But why? Well, books are more than just objects—they’re symbols of knowledge, adventure, and imagination. Artists love capturing their intricate details, from the spine to the pages, and everything in between. Plus, books come in all shapes and sizes, which means there’s endless inspiration for your drawings.
Why Books Make Great Art Subjects
Books are versatile subjects for artists because they offer so much variety. You can draw a simple paperback, a heavy encyclopedia, or even an open book with fluttering pages. Each type of book has its own unique features, and mastering them will make your art stand out. So, whether you're into realism or abstract art, books have got you covered.
Tools You’ll Need to Draw a Book
Alright, let’s talk about the gear you’ll need to start drawing a book. Don’t worry, you don’t need a million-dollar setup. In fact, most of the tools you’ll need are probably already lying around your house. Here’s a quick rundown:
- Pencils: A trusty HB pencil is a great starting point, but if you want to add depth, grab a few softer pencils like 2B or 4B.
- Eraser: Mistakes happen, and that’s okay! A good eraser will save your day.
- Sketchbook: Find one that feels comfortable to work with. You’ll be spending a lot of time with it, so choose wisely.
- Blending Tools: If you want to add some shading, blending stumps or tortillons can help smooth out those pesky pencil marks.
And that’s it! With these basics, you’re ready to rock your book drawing. Oh, and if you’re feeling fancy, you can always experiment with colored pencils, markers, or even digital tools. But for now, let’s keep it simple, yeah?
Read also:Jessica Steen
Basic Steps to Draw a Book
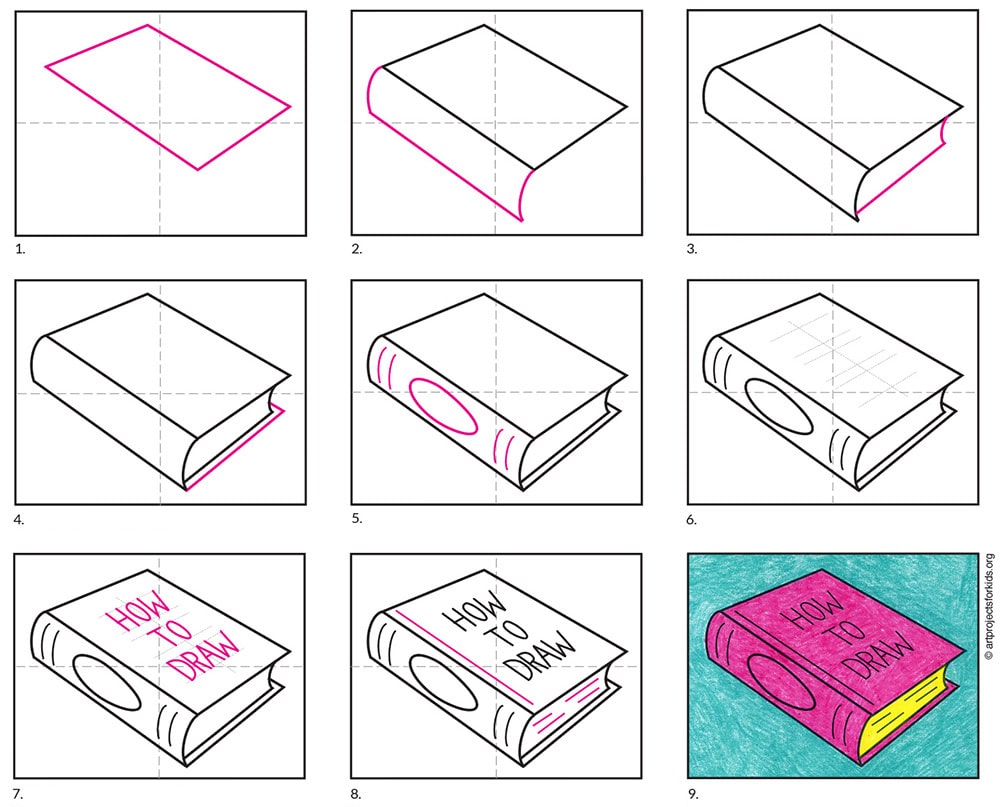
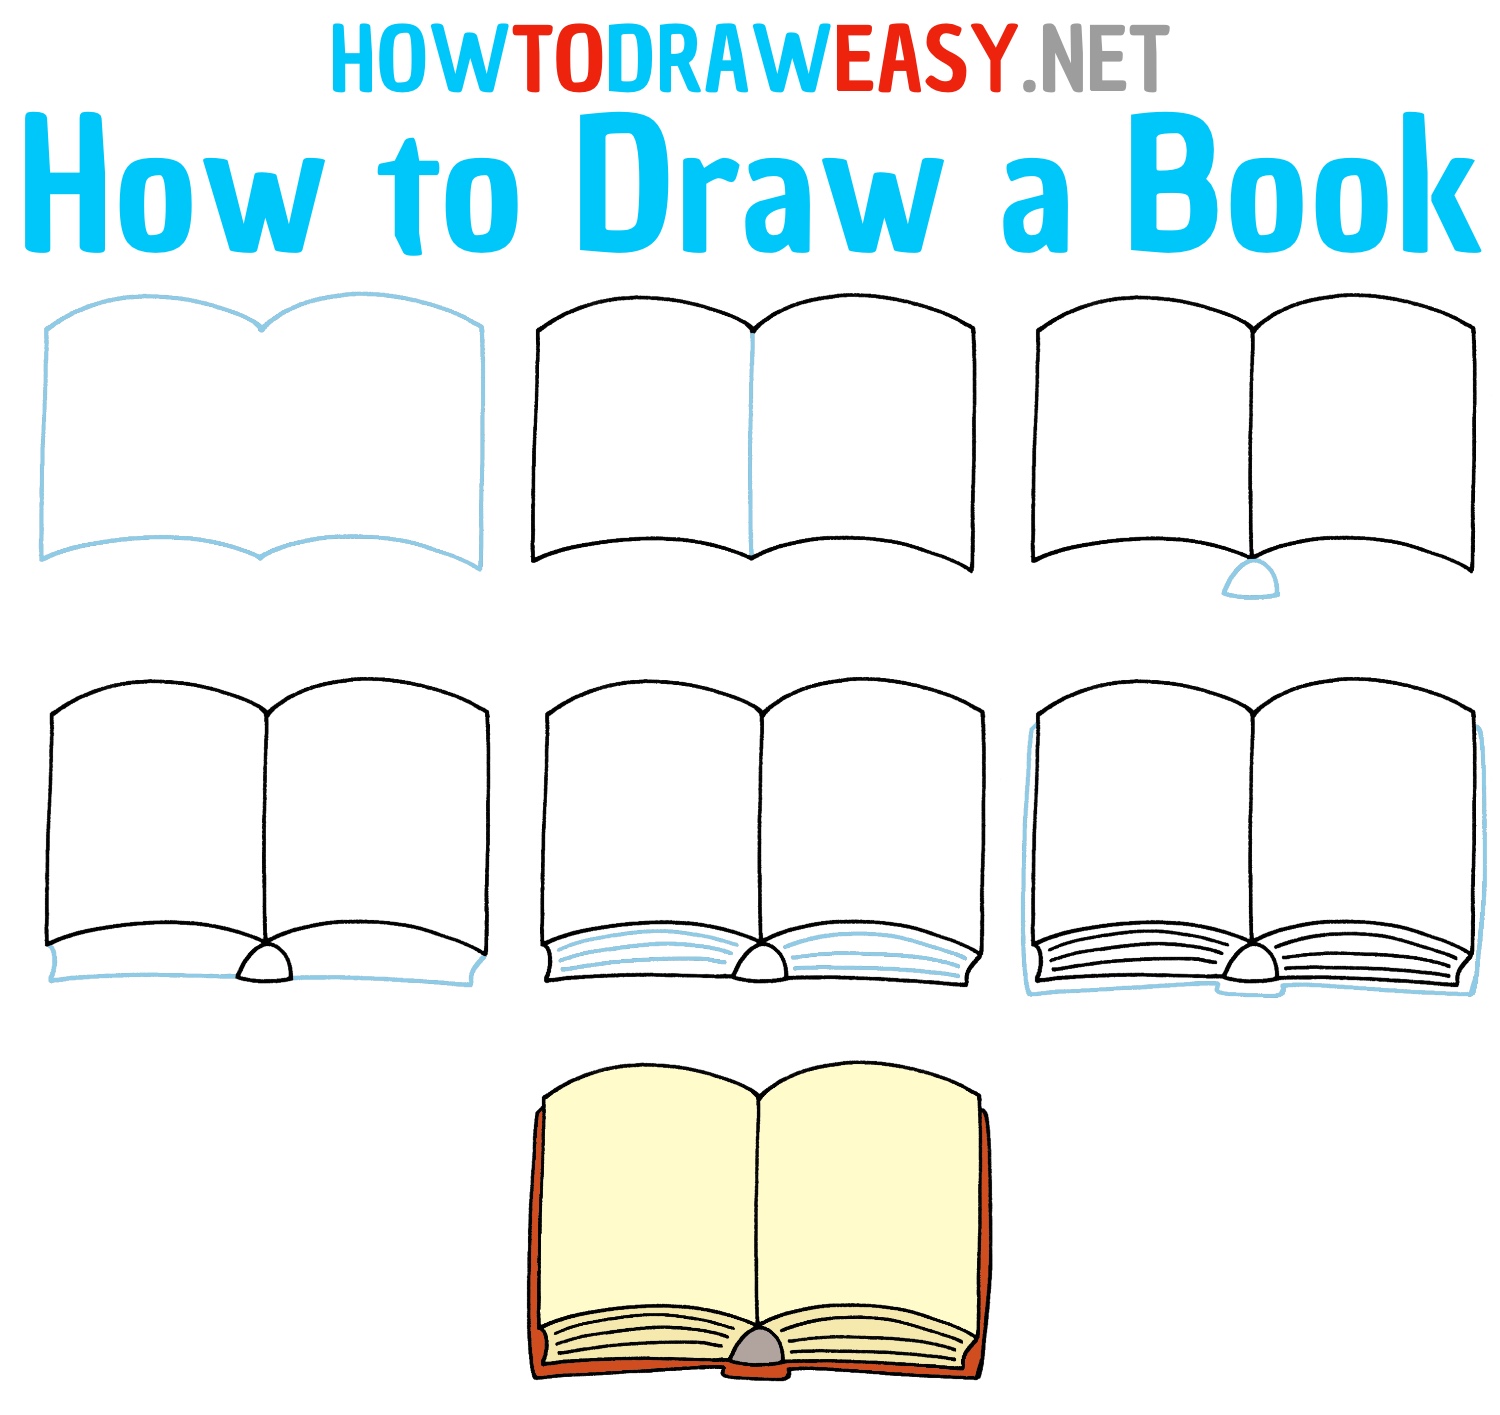
Now that you’ve got your tools ready, let’s dive into the basics of how to draw a book. This step-by-step guide will walk you through the process, from the first line to the final details. Ready? Let’s go!
Step 1: Start with the Outline
Begin by sketching the basic shape of the book. Most books are rectangular, so draw a simple rectangle to represent the cover. Don’t worry about perfection here—just get the general shape down.
Step 2: Add the Spine
Next, draw the spine of the book. This is the part where the title usually goes, so make it prominent. Add a bit of thickness to give your book some depth.
Step 3: Define the Pages
Now, it’s time to add the pages. Draw a series of small, curved lines to represent the edges of the pages. This will give your book a more realistic look.
Step 4: Refine the Shape
Take a moment to refine the overall shape of your book. Make sure everything is proportionate and balanced. Adjust any lines that look off, and erase any unnecessary marks.
Step 5: Add Details
Finally, it’s time to add those all-important details. Think about the texture of the cover, the binding, and any text or illustrations that might be on the spine. These little touches will bring your book to life.
Adding Details to Your Book Drawing
Details are what make a drawing pop, and when it comes to books, there’s plenty to explore. Here are some ideas to take your book drawing to the next level:
- Textures: Experiment with different textures for the cover. Is it smooth leather, rough paper, or shiny plastic? Each material has its own unique look and feel.
- Titles: Add a title to the spine of your book. You can make it fancy, simple, or even whimsical—it’s up to you!
- Illustrations: If you’re feeling adventurous, try adding some illustrations to the cover. Maybe it’s a landscape, a character, or even a doodle.
Remember, the more detail you add, the more realistic your book will look. But don’t overdo it—sometimes less is more!
Creating Textures and Shadows
Shading and texture are crucial if you want your book drawing to look three-dimensional. Here’s how you can achieve that:
Shading Techniques
Use cross-hatching, stippling, or blending to create shadows and highlights. These techniques will help give your book depth and dimension. Focus on areas like the spine, the edges of the pages, and any creases or folds in the cover.
Texture Tips
Think about the material of your book. Is it a hardcover with a glossy finish, or a softcover with a matte texture? Use your pencil to mimic these textures by varying the pressure and stroke of your lines.
Different Styles of Drawing Books
One of the coolest things about drawing books is that you can experiment with different styles. Here are a few ideas to get you started:
- Realism: Aim for accuracy and detail. This style is perfect if you want to create a lifelike representation of a book.
- Cartoonish: Go for a fun, exaggerated look. This style is great for kids’ books or if you just want to have some fun.
- Abstract: Break the rules and let your creativity flow. Use bold colors, shapes, and patterns to create something truly unique.
Try out different styles to see which one resonates with you. Who knows? You might discover a new favorite!
Tips for Beginners
Learning how to draw a book can seem intimidating at first, but don’t worry—everyone starts somewhere. Here are a few tips to help you along the way:
- Practice Regularly: The more you draw, the better you’ll get. Set aside some time each day to practice, even if it’s just for a few minutes.
- Study Real Books: Look at actual books and observe their shapes, textures, and details. This will help you understand how to capture them in your drawings.
- Be Patient: Rome wasn’t built in a day, and neither will your drawing skills. Take your time and enjoy the process.
And remember, mistakes are part of the learning process. Don’t be too hard on yourself—just keep practicing and you’ll see improvement over time.
Common Mistakes to Avoid
Even the best artists make mistakes, but there are a few pitfalls you can avoid when learning how to draw a book:
- Ignoring Proportions: Make sure your book’s dimensions are realistic. A cover that’s too wide or a spine that’s too thin can throw off the entire drawing.
- Forgetting Details: Don’t neglect the little things, like the edges of the pages or the texture of the cover. These details add character to your drawing.
- Overworking the Drawing: Sometimes less is more. Avoid overloading your book with too many unnecessary details.
By being aware of these common mistakes, you’ll be able to create more polished and professional-looking drawings.
Finding Inspiration for Your Book Art
Art is all about inspiration, and there’s no shortage of it when it comes to books. Here are a few places to find inspiration for your book drawings:
- Libraries and Bookstores: Visit your local library or bookstore and browse through the shelves. Look at the different shapes, sizes, and designs of the books.
- Online Galleries: Check out art websites and social media platforms to see how other artists interpret books in their work.
- Personal Collections: If you’ve got a bookshelf at home, use it as a source of inspiration. Draw your favorite books or create a series based on your collection.
Let your imagination run wild and see where it takes you. Who knows? You might discover a whole new world of book art!
Fun Projects to Try
Once you’ve mastered the basics of how to draw a book, it’s time to try out some fun projects. Here are a few ideas to get you started:
- Create a Bookshelf: Draw a collection of books on a shelf. You can mix and match different styles and sizes for a dynamic look.
- Illustrate a Scene: Combine your book drawing with a background scene. Maybe it’s a cozy reading nook or a bustling library.
- Design a Cover: Get creative with book cover designs. Think about fonts, colors, and illustrations that would make your book stand out.
These projects will not only challenge your skills but also help you grow as an artist. So grab your pencils and let’s get drawing!
Kesimpulan
And there you have it, folks! You’ve learned how to draw a book step by step, from the basic outline to the final details. Remember, practice makes perfect, so keep sketching and experimenting with different styles and techniques. Books are amazing subjects for artists because they’re full of character, texture, and meaning.
If you found this guide helpful, why not share it with your friends? Or better yet, leave a comment below and let me know how your book drawing turned out. And hey, if you’re looking for more art tips and tricks, be sure to check out our other articles. Happy drawing, and see you soon!