Alright, folks, let's get straight to the point—tying a bow isn’t as easy as it looks, but don’t sweat it. If you’re here, you’re probably wondering how to tie a bow perfectly, and trust me, you’re not alone. Whether you’re dressing up for a fancy event, learning how to tie a bow tie for the first time, or just trying to add a cute ribbon to a gift, this skill is one you’ll want to master. So, buckle up, because we’re about to dive deep into the world of bows!
You know what’s wild? Even though tying a bow seems like a basic skill, a lot of people struggle with it. I mean, think about it—how many times have you tried tying a bow on a present and ended up with something that looks like a tangled mess? Or worse, how many awkward moments have you spent trying to figure out how to tie a bow tie at the last minute before a big event? Yeah, I’ve been there too, and it’s not fun. But guess what? It doesn’t have to be that way.
This article is your ultimate guide to mastering the art of tying a bow. We’ll cover everything from the basics to advanced techniques, so whether you’re a beginner or looking to level up your bow-tying game, you’ll find something valuable here. So, grab your ribbon, bow tie, or shoelaces, and let’s get started!
Read also:Mydesi Mms
Table of Contents
- Why Learn How to Tie a Bow?
- Basic Tools You’ll Need
- Step-by-Step Guide: How to Tie a Bow
- Variations of Bows and When to Use Them
- How to Tie a Bow for Gift Wrapping
- How to Tie a Bow Tie
- How to Tie a Bow with Shoelaces
- Common Mistakes and How to Fix Them
- A Brief History of the Bow
- Wrapping It Up
Why Learn How to Tie a Bow?
Now, you might be thinking, “Why bother learning how to tie a bow? Isn’t it just a fancy knot?” Well, my friend, let me tell you why this skill is worth your time. First off, tying a bow is one of those skills that comes in handy more often than you’d think. Whether it’s for gift wrapping, accessorizing, or even tying your shoes, knowing how to tie a bow can make a big difference in how things look.
Plus, let’s not forget the confidence boost. Imagine walking into a room with a perfectly tied bow tie or presenting a gift with a beautifully wrapped bow. It’s those little details that make a big impact. And hey, who doesn’t love a good confidence boost?
Basic Tools You’ll Need
Before we dive into the nitty-gritty of tying a bow, let’s talk about the tools you’ll need. Don’t worry, it’s not rocket science. For most bows, all you need is some ribbon, a bow tie, or shoelaces. But here’s a quick rundown:
- Ribbon: For gift wrapping or decorative purposes. Make sure it’s the right width and material for your project.
- Bow Tie: If you’re going formal, a bow tie is a must-have accessory. Look for one that’s easy to adjust and fits your style.
- Shoelaces: Yep, those humble strings on your shoes. Knowing how to tie a bow with shoelaces is a basic life skill that everyone should have.
Oh, and one more thing—patience. Tying a bow takes practice, so don’t get discouraged if it doesn’t come out perfect the first time.
Step-by-Step Guide: How to Tie a Bow
Let’s Get Tying!
Alright, now that we’ve covered the basics, let’s get into the meat of it—how to tie a bow. This step-by-step guide will walk you through the process, so even if you’ve never tied a bow before, you’ll be a pro in no time.
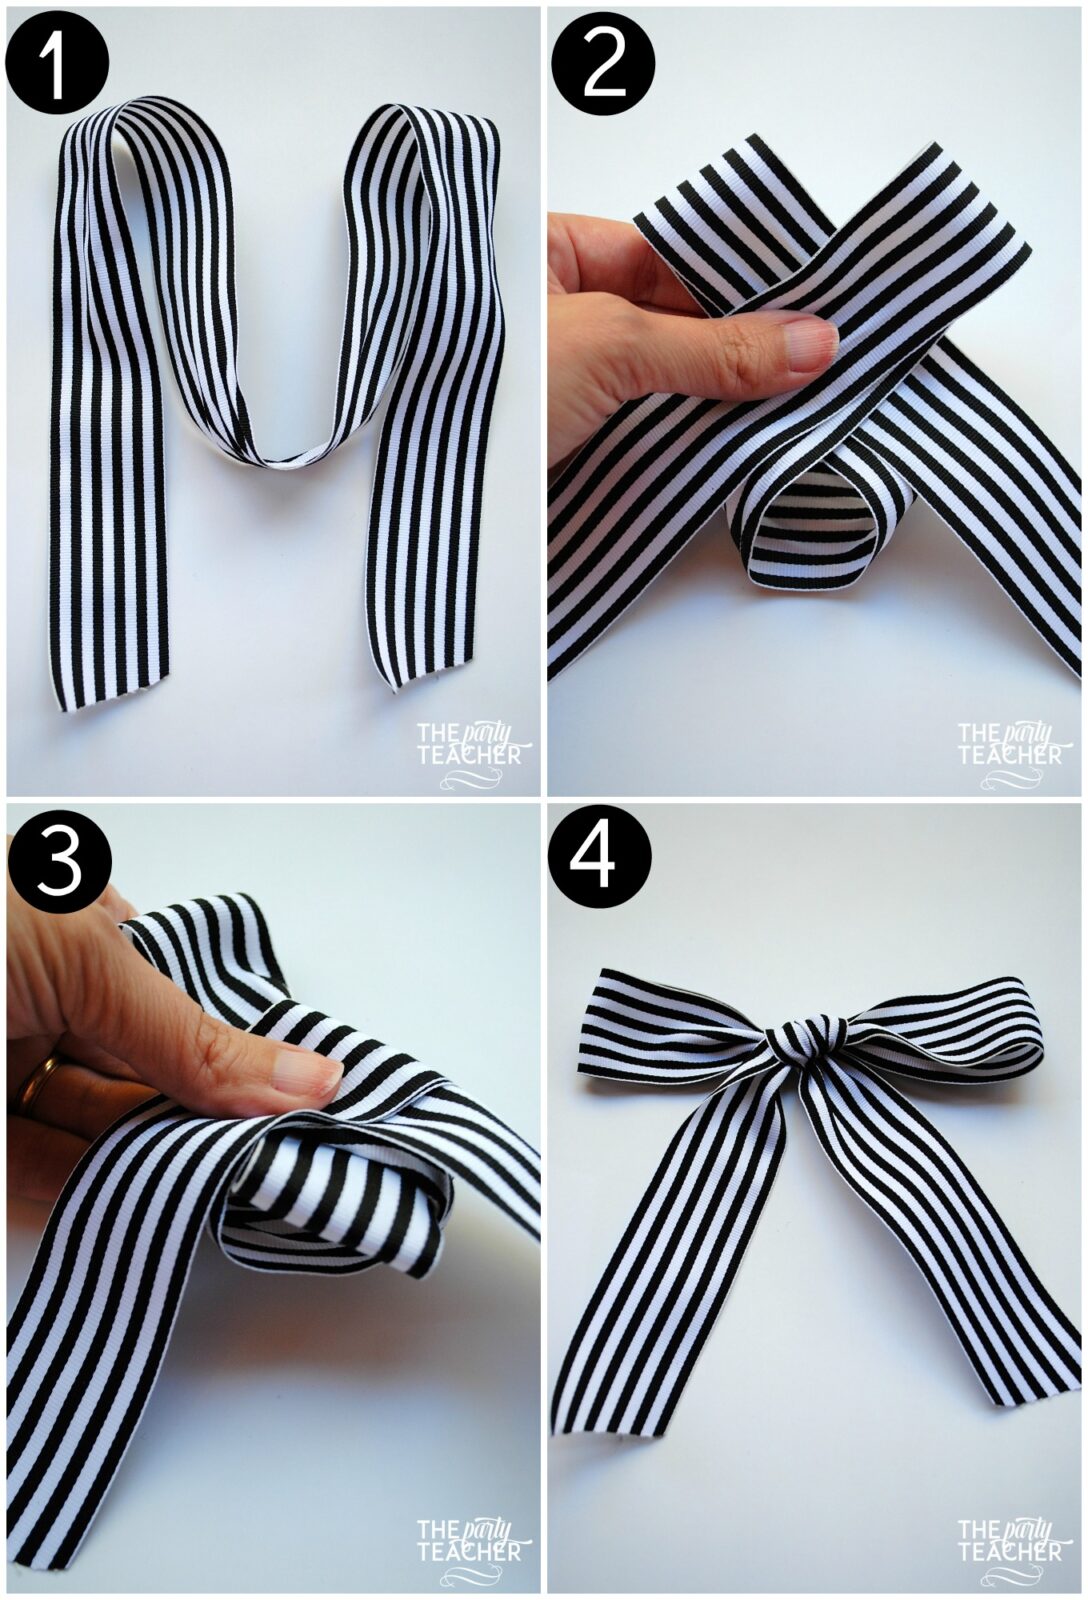
- Start with two equal lengths of ribbon, shoelace, or bow tie material.
- Cross one side over the other to form an X.
- Take the end that’s on top and loop it under the other side, pulling it tight to form a knot.
- Now, take one end and fold it into a loop. Hold it with your fingers.
- Wrap the other end around the loop and tuck it behind, forming a second loop.
- Pull both loops gently to tighten the bow. Adjust as needed.
And there you have it—a perfectly tied bow! Practice makes perfect, so don’t be afraid to try it a few times until you get the hang of it.
Read also:Diva Flawless Leak
Variations of Bows and When to Use Them
Not All Bows Are Created Equal
Did you know there are different types of bows, each with its own purpose? Here are a few variations you might want to try:
- Basic Bow: Perfect for everyday use, like tying shoelaces or simple gift wrapping.
- Butterfly Bow: A more intricate design often used for formal events or decorative purposes.
- Pom-Pom Bow: Ideal for crafting projects or adding a playful touch to gifts.
- Wreath Bow: A larger bow used for decorating wreaths or centerpieces.
Choosing the right bow depends on the occasion and the material you’re working with. Don’t be afraid to experiment and find what works best for you!
How to Tie a Bow for Gift Wrapping
Gifting someone a present with a beautifully tied bow is like adding the cherry on top of a sundae. Here’s how you can make your gifts stand out:
- Choose a ribbon that complements the wrapping paper.
- Secure the ribbon around the gift with tape or a small piece of ribbon.
- Follow the step-by-step guide above to tie your bow.
- Adjust the loops and tails to make sure everything is symmetrical.
Pro tip: Use a hot glue gun to secure the bow if you’re worried about it coming undone. Just be careful not to burn yourself!
How to Tie a Bow Tie
Level Up Your Formalwear Game
Tying a bow tie can seem intimidating, but with the right technique, it’s totally doable. Here’s how:
- Place the bow tie around your neck, with one end hanging lower than the other.
- Cross the longer end over the shorter one and pull it through to form a simple knot.
- Fold the longer end into a loop and hold it with your fingers.
- Take the shorter end, fold it into a loop, and tuck it behind the first loop.
- Pull both loops gently to tighten the bow tie. Adjust as needed.
And just like that, you’ve got a perfectly tied bow tie. Practice in front of a mirror to get the hang of it.
How to Tie a Bow with Shoelaces
Tying your shoelaces might seem like second nature, but let’s break it down for clarity:
- Cross the laces to form an X and pull one end through to make a knot.
- Make a loop with one lace and hold it with your fingers.
- Wrap the other lace around the loop and tuck it behind, forming a second loop.
- Pull both loops to tighten the bow.
Voilà! Your shoes are ready to go. And if you’re worried about your laces coming undone, consider double-knotting them for extra security.
Common Mistakes and How to Fix Them
Even the best bow-tiers make mistakes sometimes. Here are a few common issues and how to fix them:
- Asymmetrical Bows: Make sure both loops are the same size before tightening the bow.
- Loose Knots: Pull the loops and tails firmly to ensure the bow stays in place.
- Tangled Ribbon: Straighten out the ribbon before starting to avoid knots and tangles.
Remember, practice makes perfect. Don’t get discouraged if your first few attempts don’t turn out perfectly. Keep at it, and you’ll get the hang of it in no time!
A Brief History of the Bow
Believe it or not, the bow has a rich history that dates back centuries. Originally used for practical purposes, like securing packages or tying garments, the bow eventually evolved into a decorative accessory. In the 18th century, bow ties became a symbol of elegance and sophistication, worn by the elite during formal events.
Today, bows are used in a variety of ways, from gift wrapping to fashion accessories. They’ve become a staple in both casual and formal settings, proving that sometimes the simplest designs can make the biggest impact.
Wrapping It Up
There you have it, folks—your ultimate guide to how to tie a bow. Whether you’re wrapping gifts, accessorizing with a bow tie, or simply tying your shoelaces, mastering this skill can add a touch of elegance and confidence to your everyday life. Remember, practice is key, so don’t be afraid to try it a few times until you get it just right.
So, what are you waiting for? Grab your ribbon, bow tie, or shoelaces and start tying those bows! And if you found this article helpful, don’t forget to share it with your friends or leave a comment below. Happy tying, and see you in the next one!