So, you wanna learn how to draw a basketball? Let's be real—drawing this iconic orange sphere with its curvy lines ain't as easy as it looks. But don't stress, because I'm here to break it down for you step by step. Whether you're sketching for fun or aiming to impress your art teacher, this guide will help you nail it. Let's get started, shall we?
Drawing a basketball is more than just doodling a circle and throwing some lines in there. It's about capturing the essence of the ball—the texture, the curves, and the way it looks when it's resting on the court or flying through the air. This tutorial isn't just about teaching you how to draw; it's about helping you think like an artist. And trust me, that makes all the difference.
Before we dive into the nitty-gritty, let's talk about why mastering this skill matters. If you're into sports art or just love basketball, learning how to draw a basketball adds a cool trick to your creative arsenal. Plus, it's a great foundation for drawing other sports equipment. So, grab your pencil, and let's make some magic happen!
Read also:Aswad Ayinde
Why Drawing a Basketball is Essential for Artists
Here's the deal—basketballs aren't just balls; they're symbols. They represent energy, movement, and competition. When you draw one, you're not just sketching an object; you're capturing a piece of the game. For artists who love sports, mastering this skill is like hitting a three-pointer—it's satisfying and shows off your talent.
Learning how to draw a basketball also teaches you about perspective and shading. Those curvy lines on the ball? They're not random. They're designed to guide the ball's grip, and drawing them accurately requires precision. This skill helps you improve your overall drawing ability, making you better at sketching other objects too.
Understanding the Basketball's Structure
Before you put pencil to paper, it's important to understand what makes a basketball unique. It's not just a round ball—it's got that signature orange color, black lines, and a specific texture. These elements are key to making your drawing look authentic.
- The ball is typically made of leather or rubber, which gives it a slightly bumpy surface.
- It has four main lines that wrap around it, creating a distinctive pattern.
- The color is usually bright orange, but it can vary depending on the brand or type of ball.
By studying these features, you'll have a clearer idea of how to approach your drawing. It's like studying the playbook before a big game—you need to know the rules to win!
Tools You'll Need to Draw a Basketball
Alright, let's talk tools. You don't need anything fancy to start, but having the right supplies can make a huge difference in your final result. Here's what you'll need:
- A good pencil (HB or 2B works great for beginners).
- Erasers (both kneaded and regular are useful).
- Sketch paper or a sketchbook.
- Optional: colored pencils or markers for shading and coloring.
These tools might seem basic, but they're all you need to create a stunning basketball drawing. Remember, it's not about the tools—it's about how you use them. So, don't sweat it if you don't have the fanciest pencil on the market. Confidence and practice are your best allies here.
Read also:Dogxxxxxx
Choosing the Right Paper
Not all paper is created equal, especially when it comes to drawing. For this project, you'll want to use sketch paper or a sketchbook with a smooth surface. Why? Because it allows your pencil to glide smoothly, giving you better control over your lines. If you're planning to color your drawing, make sure the paper can handle colored pencils or markers without bleeding.
Step-by-Step Guide: How to Draw a Basketball
Now that you've got your tools ready, let's dive into the step-by-step process. This guide is designed to be simple and easy to follow, so even if you're a complete beginner, you'll be able to create something awesome.
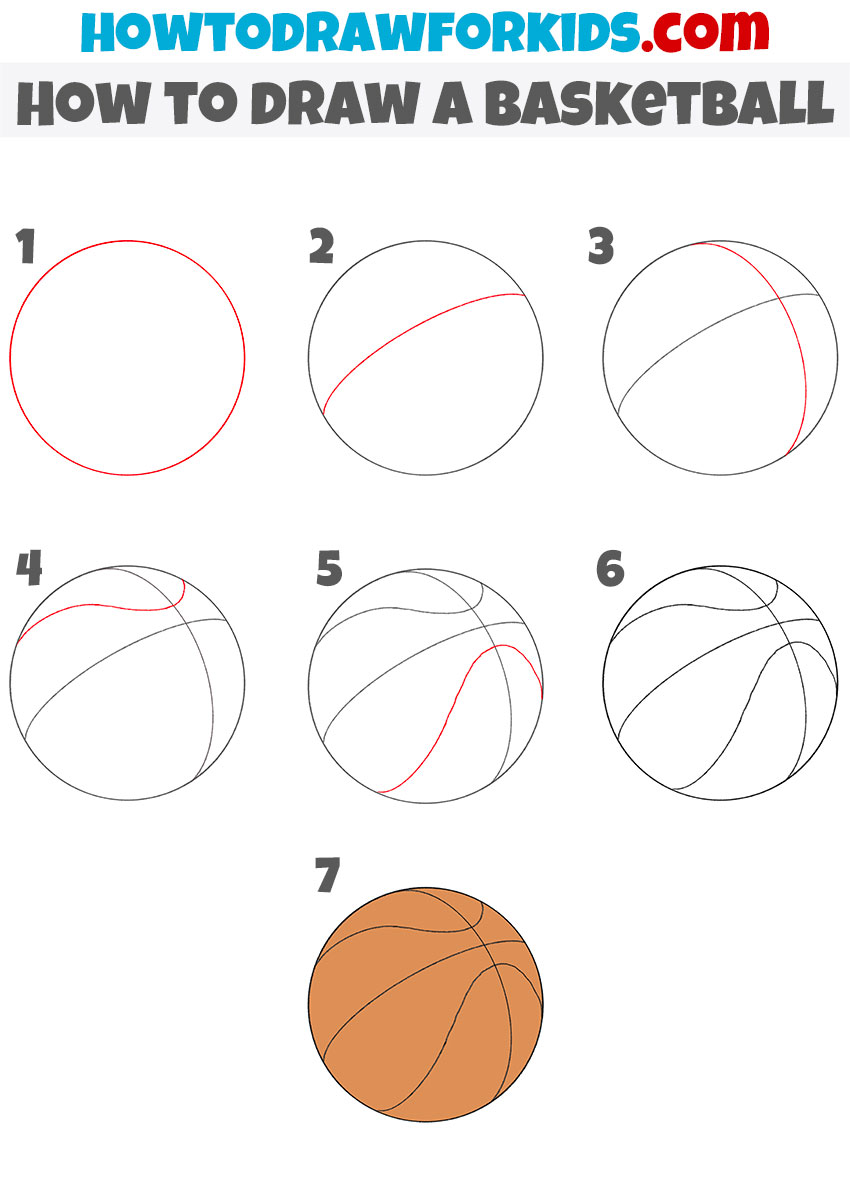
Step 1: Start with a Circle
Every great basketball drawing starts with a perfect circle. Use a compass if you need to, but freehanding it is a great skill to practice. Don't worry if it's not perfect—no one's expecting you to be a math wizard here. Just aim for something round and balanced.
Step 2: Add the Main Lines
Once your circle is in place, it's time to add the iconic lines. Start with the vertical line that runs through the center of the ball. Then, add the horizontal line that intersects it. These two lines should be slightly curved to give the ball a more realistic look.
Step 3: Sketch the Secondary Lines
Now, add the two diagonal lines that complete the pattern. These lines should also be slightly curved and should meet at the top and bottom of the ball. Take your time with this step—it's what makes your drawing look like a real basketball.
Step 4: Refine Your Lines
Once all the lines are in place, go over them to make sure they're clean and consistent. Erase any extra marks or mistakes, and make sure the lines are evenly spaced. This step is crucial for creating a polished final product.
Shading Techniques for Realism
Shading is where the magic happens. It's what gives your basketball drawing depth and makes it look three-dimensional. Here's how you can add shading to your masterpiece:
- Start by identifying the light source. Where is the light coming from? This will determine where the highlights and shadows go.
- Use a lighter touch to add shading to the areas that are farther from the light source.
- For the highlights, leave those areas blank or use an eraser to lighten them up.
Remember, shading is all about patience and practice. Don't rush it—take your time to build up the layers until you're happy with the result.
Adding Texture to Your Drawing
Texture is what makes your basketball look like it's ready for the court. To add texture, use small, circular motions with your pencil to mimic the ball's surface. Be gentle—too much pressure can make the texture look unnatural.
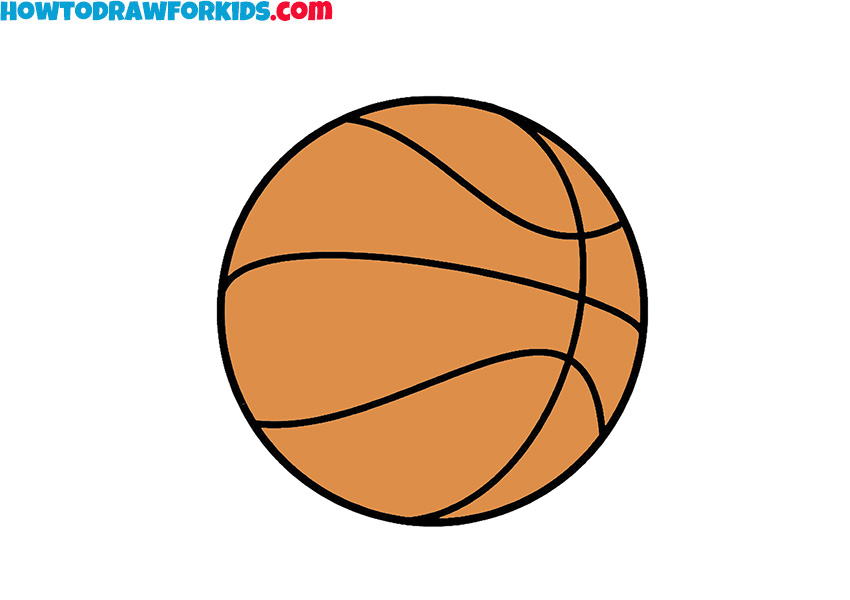
Coloring Your Basketball
Once your shading and texture are in place, it's time to bring your drawing to life with color. Here's how you can do it:
Step 1: Choose Your Colors
Most basketballs are bright orange with black lines, but you can get creative if you want. Use colored pencils or markers to add color to your drawing. Start with the main color, then move on to the lines.
Step 2: Add Depth with Layering
Layering colors can add depth and richness to your drawing. Use different shades of orange to create highlights and shadows, and don't be afraid to experiment with blending techniques.
Tips and Tricks for Beginners
Here are a few tips to help you improve your basketball drawing skills:
- Practice drawing circles often. It might sound boring, but it's a fundamental skill that will pay off in the long run.
- Study real basketballs. Look at how the lines curve and how the light hits the surface. Observing real-life objects is one of the best ways to improve your drawing.
- Don't be afraid to make mistakes. Every great artist started as a beginner, and mistakes are just part of the learning process.
Common Mistakes to Avoid
Here are a few common mistakes beginners make when drawing basketballs:
- Forgetting to curve the lines. Straight lines might look okay at first, but they won't give your drawing that authentic basketball look.
- Not paying attention to proportions. Make sure the lines are evenly spaced and the ball is balanced.
- Rushing the shading process. Take your time with shading—it's what makes your drawing pop.
Advanced Techniques for Pro Artists
If you're ready to take your basketball drawing skills to the next level, here are a few advanced techniques to try:
Adding Perspective
Try drawing the basketball from different angles. This will challenge your skills and help you understand how the lines and curves change depending on the perspective.
Creating Movement
Instead of drawing a stationary basketball, try sketching it in motion. This could mean showing it bouncing, flying through the air, or being held by a player. Adding movement can make your drawing more dynamic and exciting.
Conclusion: Take Your Basketball Drawing to the Next Level
So, there you have it—a complete guide on how to draw a basketball. Whether you're a beginner or a seasoned artist, I hope this tutorial has given you the tools and confidence to create something amazing. Remember, practice makes perfect, and every drawing you create is a step forward in your artistic journey.
Now, here's your call to action: share your basketball drawing with the world! Post it on social media, tag me, and let's see what you've created. And if you're hungry for more art tips, check out our other tutorials. Until next time, keep drawing and keep hustling!
Table of Contents