**Learning how to draw hair can feel like unraveling a tangled mess, but trust me, it's not as complicated as it seems. Hair is one of the most dynamic elements in art, bringing life and character to your creations. Whether you're sketching a realistic portrait or creating an anime-style masterpiece, mastering this skill will elevate your work to the next level. So, grab your pencil and let's dive into the world of hair drawing!**
When it comes to art, hair is often the pièce de résistance—the finishing touch that makes or breaks a piece. It's the element that adds depth, texture, and personality to your characters. But how do you get started? Don't worry; we've got you covered. In this guide, we'll break down everything you need to know about how to draw hair step by step.
This article isn't just about theory; it's packed with practical tips, tricks, and techniques that you can apply immediately. Whether you're a beginner or looking to refine your skills, you'll find something valuable here. So, let's get started and turn those tangled locks into works of art!
Read also:Skydoesminecraft Controversy
Here’s a quick overview of what we’ll cover:
- Understanding Hair Structure
- Tools You’ll Need
- Basic Techniques for Drawing Hair
- Realistic vs. Stylized Hair
- Different Types of Hair
- Shading and Highlights
- Common Mistakes to Avoid
- Understanding Hair Flow and Direction
- Step-by-Step Guide to Drawing Hair
- Practice Tips for Improvement
Understanding Hair Structure
Before we dive into the nitty-gritty of how to draw hair, let's first talk about its structure. Hair isn’t just random strands flying around; it has a specific anatomy that artists need to understand. Each strand of hair is part of a larger group called a "hair clump," and these clumps follow specific flow patterns. Knowing this will help you create more realistic and cohesive hair in your drawings.
Here’s a quick breakdown of hair anatomy:
- Root: The part of the hair that connects to the scalp. This is usually hidden under the skin.
- Shaft: The visible part of the hair that you’ll be drawing.
- Tips: The ends of the hair, which are often lighter due to wear and tear.
Understanding how these parts interact is crucial for creating believable hair. For example, if you’re drawing a person with curly hair, the shafts will form spirals, while straight hair will have smoother, more linear patterns.
Why Understanding Hair Structure Matters
Think of hair as a puzzle. Each strand is a piece, and when they come together, they form a cohesive whole. If you skip understanding the structure, your drawing might look messy or unrealistic. By grasping how hair clumps work, you can create more natural-looking hairstyles that complement your characters.
Tools You’ll Need
Now that you understand the basics of hair structure, let's talk about the tools you’ll need to bring your art to life. The good news is, you don’t need anything fancy to start. Here’s a list of essentials:
Read also:Indian Leaked Mms Videos
- Pencils (HB, 2B, 4B, 6B)
- Eraser (kneaded and white)
- Blending tools (tortillons or blending stumps)
- Sketchbook or drawing paper
- Optional: digital drawing tablet if you’re working digitally
For beginners, I recommend starting with traditional pencils and paper. It’s a great way to build foundational skills before moving on to digital tools. Plus, there’s something magical about the tactile experience of pencil on paper!
Basic Techniques for Drawing Hair
Alright, let’s get down to business. Here are some basic techniques that will help you draw hair like a pro:
1. Start with Simple Shapes
When drawing hair, it’s tempting to jump straight into detailing individual strands. Resist that urge! Instead, start with basic shapes to establish the overall form. Think of hair as a mass rather than individual strands. Use soft, flowing lines to outline the general shape of the hairstyle.
2. Focus on Clumps, Not Strands
As I mentioned earlier, hair clumps are your best friend. Instead of trying to draw every single strand, focus on creating clumps. These clumps will give your drawing a sense of volume and movement. Practice breaking down complex hairstyles into smaller, manageable sections.
3. Use Light and Shadow
Lighting plays a huge role in how hair looks. Pay attention to where the light source is coming from and how it affects the hair. Highlight the areas that catch the light and add shadows to create depth. This technique will make your hair look three-dimensional and realistic.
Realistic vs. Stylized Hair
One of the first decisions you’ll need to make is whether you want to draw realistic or stylized hair. Both styles have their own set of challenges and rewards.
Realistic Hair
Realistic hair requires a keen eye for detail. You’ll need to pay close attention to textures, lighting, and shading. This style is perfect for portraits or any artwork that demands a high level of accuracy.
Stylized Hair
On the other hand, stylized hair gives you more creative freedom. You can exaggerate certain features or simplify others to fit the aesthetic of your character. Anime and manga artists often use this approach to create dynamic, expressive hairstyles.
Remember, there’s no right or wrong choice here. It all depends on the look you’re going for. Experiment with both styles to see which one suits your artistic vision.
Different Types of Hair
Not all hair is created equal. Different types of hair have unique characteristics that require specific techniques to draw. Let’s take a look at some common hair types:
- Straight Hair: Smooth and linear, straight hair is great for practicing clean lines and even shading.
- Wavy Hair: Adds a bit of complexity with its gentle curves and flow.
- Curly Hair: A challenge for many artists, but also a lot of fun to draw. Focus on creating tight spirals and overlapping strands.
- Coily Hair: Known for its tight curls and zigzag patterns, coily hair requires a different approach to shading and texture.
Each type of hair has its own set of rules, but the key is to observe and practice. The more you draw different hair types, the more comfortable you’ll become.
Shading and Highlights
Shading is what brings your hair to life. Here are some tips to help you master this crucial skill:
1. Identify the Light Source
Knowing where the light is coming from is essential for effective shading. This will determine where your highlights and shadows should go. For example, if the light is coming from above, the top of the hair will be lighter, while the underside will be darker.
2. Layer Your Shading
Don’t try to achieve perfect shading in one go. Build up your layers gradually, starting with light strokes and gradually adding darker tones. This approach gives you more control and allows for smoother transitions.
3. Use Blending Techniques
Blending tools like tortillons or blending stumps can help you create smooth gradients and seamless transitions between light and dark areas. Experiment with different blending techniques to find what works best for you.
Common Mistakes to Avoid
Even the best artists make mistakes, but learning from them is what makes us better. Here are some common pitfalls to watch out for:
- Overdrawing Strands: Too much detail can make your drawing look cluttered. Remember, less is often more.
- Ignoring Hair Clumps: Focusing on individual strands instead of clumps can lead to unrealistic results.
- Forgetting Highlights: Highlights add dimension and make your hair look more dynamic. Don’t skip them!
By being aware of these mistakes, you can avoid them and improve your technique over time.
Understanding Hair Flow and Direction
Hair doesn’t just grow in random directions; it follows specific flow patterns. Understanding these patterns is key to creating realistic hairstyles. For example, hair on the crown of the head tends to grow outward, while hair on the sides flows downward.
Here’s a quick tip: Look at reference photos to study how hair flows on different parts of the scalp. This will give you a better understanding of how to draw natural-looking hairstyles.
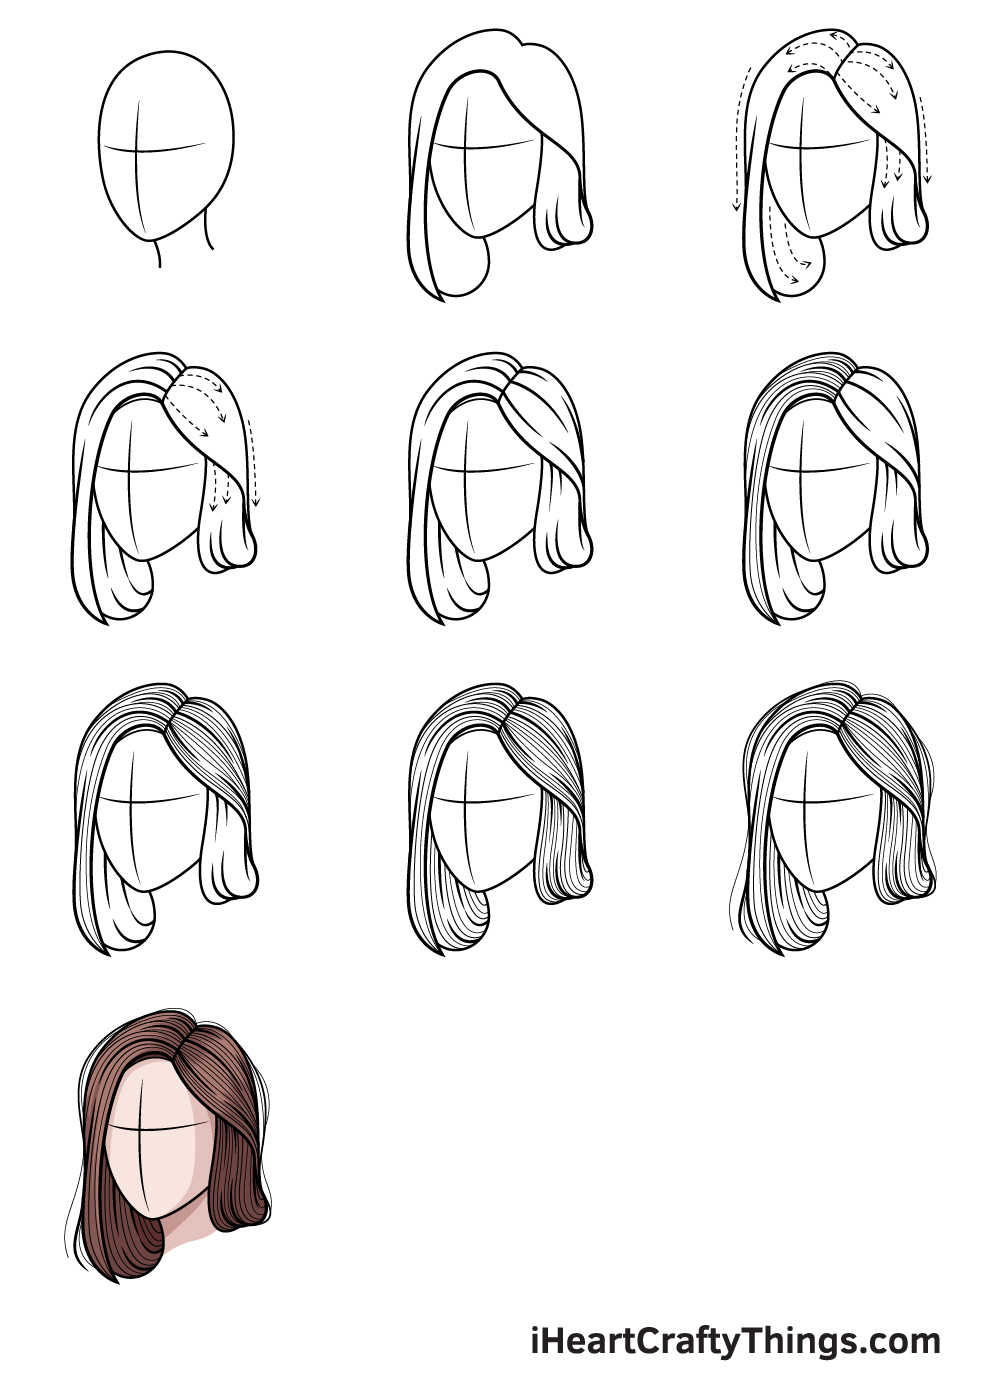
Step-by-Step Guide to Drawing Hair
Now that you’ve learned the basics, let’s put it all together with a step-by-step guide:
Step 1: Sketch the Head
Start by drawing the outline of the head. This will serve as the foundation for your hairstyle.
Step 2: Block in the Hair Mass
Using light, flowing lines, block in the overall shape of the hairstyle. Think of it as creating a rough blueprint for your drawing.
Step 3: Define the Clumps
Break down the hair mass into smaller clumps. This will give your drawing structure and make it easier to add details later.
Step 4: Add Texture and Details
Now it’s time to add texture and individual strands. Pay attention to how the hair interacts with the face and neck.
Step 5: Shade and Highlight
Using your shading techniques, add depth and dimension to your drawing. Don’t forget to include highlights to bring your hair to life.
Practice Tips for Improvement
Practice makes perfect, and drawing hair is no exception. Here are some tips to help you improve:
- Study real-life references to understand how hair behaves in different conditions.
- Practice drawing different hairstyles to expand your skill set.
- Experiment with new techniques and tools to find what works best for you.
Remember, every artist has their own journey. Keep pushing yourself, and don’t be afraid to make mistakes. They’re all part of the learning process!
Kesimpulan
Learning how to draw hair might seem daunting at first, but with practice and patience, you can master this skill. By understanding hair structure, using the right techniques, and studying different hair types, you’ll be able to create stunning hairstyles that bring your characters to life.
So, what are you waiting for? Grab your pencils and start practicing! And don’t forget to share your progress with us in the comments below. We’d love to see how you’re doing!