Ever wondered how to make paper snowflakes? Well, you’re in luck because this guide is about to blow your mind with creative ideas and step-by-step instructions. Whether you’re looking for a fun activity to do with the kids or want to spice up your home decor, paper snowflakes are the perfect solution. So grab your scissors, some paper, and let’s dive into the world of winter wonderland crafts!
There’s something magical about snowflakes. They’re delicate, intricate, and no two are alike. And guess what? You can recreate that magic indoors without freezing your fingers off! Making paper snowflakes is not only easy but also super rewarding. Plus, it’s a great way to unleash your creativity and add a festive touch to any room.
Before we get into the nitty-gritty details, let me assure you that this isn’t just another crafting tutorial. We’ll cover everything from the basics of how to make paper snowflakes to advanced techniques that will take your designs to the next level. So whether you’re a beginner or a seasoned crafter, there’s something here for everyone. Let’s get started!
Read also:Gloria Bell Malone
Why Making Paper Snowflakes is a Must-Try
There’s a reason why paper snowflakes have been a classic craft for generations. Not only are they fun to make, but they also serve as a beautiful reminder of the beauty of winter. Plus, they’re incredibly versatile. You can use them as decorations, gift toppers, or even as part of a DIY card. And the best part? All you need is some paper and scissors—no fancy tools required!
What You’ll Need to Get Started
Before we jump into the how-to, let’s talk about the supplies you’ll need:
- Paper (any type will work, but white printer paper or colored craft paper is ideal)
- A pair of sharp scissors
- A pencil (optional, for sketching out designs)
- A ruler (if you want to make perfectly symmetrical shapes)
That’s it! Simple, right? Now that you’ve got your supplies ready, let’s move on to the fun part.
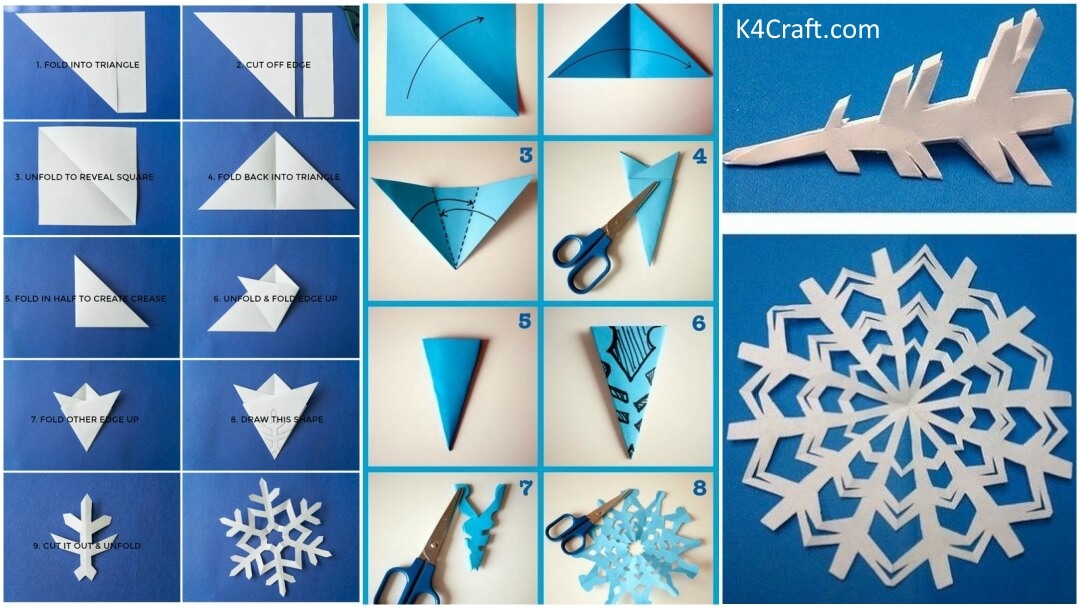
Step-by-Step Guide on How to Make Paper Snowflakes
Step 1: Start with a Square
The first step in making a paper snowflake is to create a square piece of paper. If you’re using rectangular paper, simply fold one corner over to form a triangle, then trim off the excess. Voila! You’ve got yourself a perfect square.
Step 2: Fold It Up
Now it’s time to fold your square into a smaller shape. Fold it in half diagonally to create a triangle, then fold it in half again. If you want a six-sided snowflake, fold it one more time so that the edges meet in the center. This will give you a cone-like shape.
Step 3: Cut Away
This is where the magic happens! Use your scissors to cut out various shapes along the edges of the folded paper. You can make triangles, circles, squares, or even more complex designs. Just remember to leave some parts uncut so that your snowflake holds together.
Read also:Xnnn
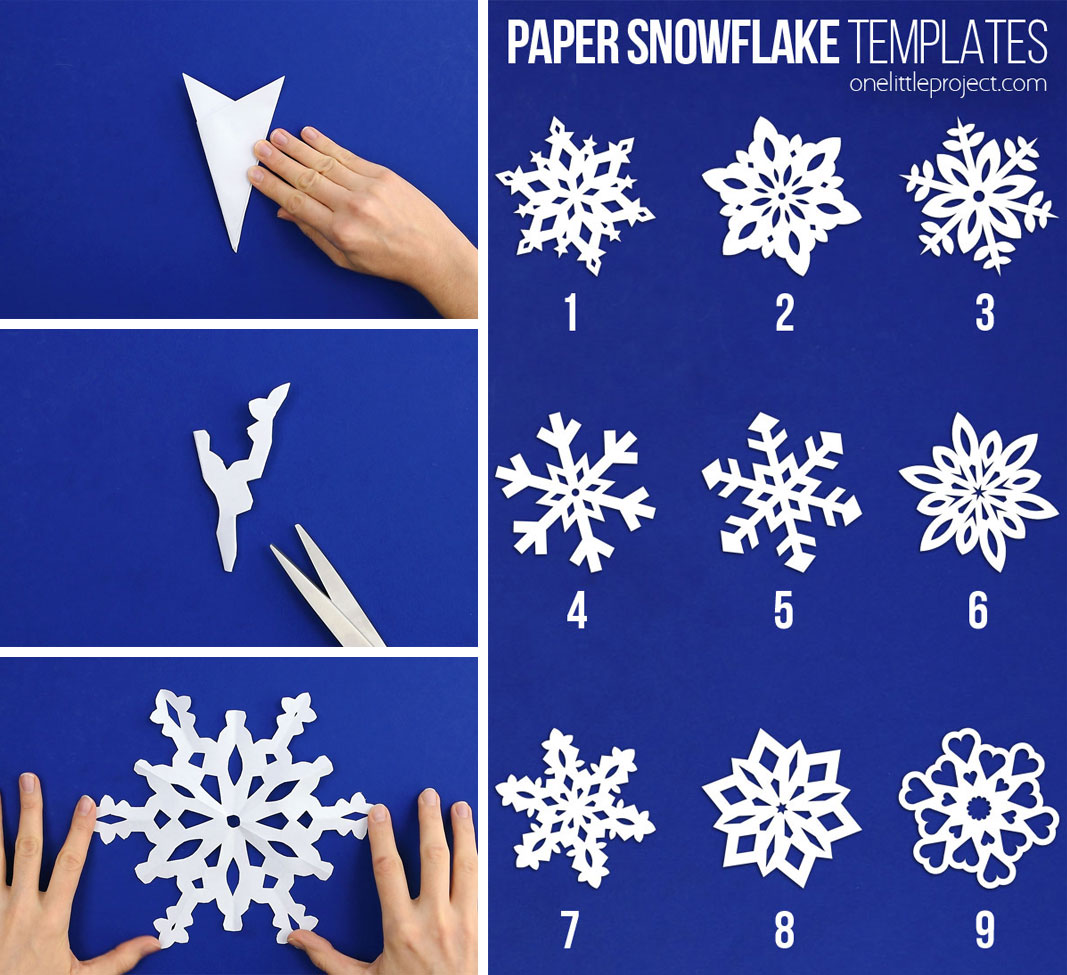
Step 4: Unfold and Admire
Once you’ve finished cutting, carefully unfold your paper to reveal your masterpiece. Ta-da! You’ve just created your very own paper snowflake. Wasn’t that easy?
Advanced Techniques for Paper Snowflakes
If you’re ready to take your snowflake-making skills to the next level, here are a few advanced techniques to try:
- Experiment with different types of paper, such as tissue paper or metallic paper, for a unique look.
- Use a hole punch to add extra details, like tiny circles or stars.
- Try layering multiple snowflakes together for a 3D effect.
- Use a lightbox or tracing paper to create intricate designs before cutting.
These techniques will help you create snowflakes that are truly one-of-a-kind. So don’t be afraid to think outside the box and let your imagination run wild!
Tips and Tricks for Perfect Snowflakes
Here are a few tips to help you make the best paper snowflakes possible:
- Use sharp scissors to ensure clean cuts.
- Start with simple designs if you’re new to snowflake-making, then gradually move on to more complex patterns.
- Don’t be afraid to make mistakes—sometimes the "imperfect" cuts are what make your snowflake unique.
- Hang your snowflakes from the ceiling or windows for a beautiful winter display.
Remember, the key to making great snowflakes is practice. The more you do it, the better you’ll get. And who knows? You might just discover a hidden talent for paper art!
Decorating with Paper Snowflakes
Once you’ve mastered how to make paper snowflakes, the next step is figuring out how to use them. Here are a few ideas:
- Hang them from the ceiling with fishing line for a whimsical winter wonderland effect.
- Stick them on windows using double-sided tape or static cling.
- Use them as gift toppers for a personal touch.
- Incorporate them into DIY cards or invitations.
These ideas are just the tip of the iceberg. The possibilities are endless when it comes to decorating with paper snowflakes!
Fun Facts About Snowflakes
Did you know that snowflakes are formed when water vapor in the air freezes into ice crystals? Each snowflake is unique because the conditions in the atmosphere are constantly changing, affecting the way the crystals grow. In fact, scientists estimate that there are over one trillion possible snowflake shapes!
And here’s another fun fact: the largest snowflake ever recorded was 15 inches wide and 8 inches thick. Can you imagine trying to make a paper snowflake that big? Now that would be a challenge!
Common Mistakes to Avoid
While making paper snowflakes is relatively easy, there are a few common mistakes that beginners tend to make. Here’s what to watch out for:
- Cutting too much off the edges, which can cause the snowflake to fall apart.
- Not folding the paper evenly, resulting in an asymmetrical design.
- Using dull scissors, which can lead to jagged cuts and uneven edges.
By avoiding these mistakes, you’ll be able to create snowflakes that are both beautiful and durable.
How to Teach Kids to Make Paper Snowflakes
Making paper snowflakes is a fantastic activity for kids, but it’s important to approach it in a way that’s both fun and educational. Here are a few tips:
- Start with simple shapes and gradually introduce more complex designs as they gain confidence.
- Encourage creativity by letting them choose their own paper colors and patterns.
- Use safety scissors if you’re working with younger children.
- Turn it into a learning experience by discussing the science behind real snowflakes.
Not only will your kids have a blast, but they’ll also learn valuable skills like fine motor control and problem-solving.
Conclusion: Get Crafting Today!
So there you have it—everything you need to know about how to make paper snowflakes. From the basics to advanced techniques, this guide has covered it all. Whether you’re looking for a fun activity to do with the family or want to add a touch of winter magic to your home, paper snowflakes are the perfect solution.
Now it’s your turn to get crafting! Grab your supplies and start creating your own unique snowflakes. And don’t forget to share your creations with us in the comments below. We’d love to see what you come up with. Happy crafting!
Table of Contents
- Why Making Paper Snowflakes is a Must-Try
- What You’ll Need to Get Started
- Step-by-Step Guide on How to Make Paper Snowflakes
- Advanced Techniques for Paper Snowflakes
- Tips and Tricks for Perfect Snowflakes
- Decorating with Paper Snowflakes
- Fun Facts About Snowflakes
- Common Mistakes to Avoid
- How to Teach Kids to Make Paper Snowflakes
- Conclusion: Get Crafting Today!
Remember, crafting is all about having fun and expressing yourself. So don’t be afraid to experiment and try new things. Who knows? You might just discover a new passion for paper art!