Ever wondered how to curl hair with flat iron like a pro? Well, you're not alone. Many people are ditching traditional curling irons for the versatility of flat irons, and for good reason. Not only can a flat iron straighten your hair, but it can also create stunning curls that last all day. So, whether you're heading to a fancy dinner or just want to spice up your everyday look, this guide is here to help you master the art of flat iron curls.
Let's be honest, curling your hair with a flat iron might sound intimidating at first. But trust me, once you get the hang of it, you'll wonder why you didn't try it sooner. Plus, it’s super affordable and doesn’t require any fancy tools. All you need is a flat iron, some heat protectant spray, and a bit of patience.
Now, before we dive into the nitty-gritty details, let’s talk about why flat iron curls are a game-changer. They’re not only easier to achieve but also more versatile than traditional methods. So, grab your flat iron and let’s get started!
Read also:Bill Gatzimos Age
Understanding Your Flat Iron
First things first, not all flat irons are created equal. When it comes to curling your hair, the type of flat iron you use can make a big difference. Here are a few things to keep in mind:
- Choose a flat iron with a ceramic or tourmaline plate for smoother results.
- Make sure your flat iron has adjustable temperature settings. Lower temperatures are great for fine hair, while higher temps work better for thick or coarse hair.
- Consider the size of the plates. Wider plates are better for longer hair, while narrower plates work well for shorter styles.
Remember, investing in a quality flat iron will save you time and effort in the long run. Plus, it'll keep your hair healthy and shiny.
Preparing Your Hair
Before you start curling, it's important to prep your hair properly. Here’s how:
Step 1: Clean and Dry
Start with clean, dry hair. Wet hair can get damaged when exposed to high heat, so make sure it’s completely dry before you begin. If your hair is naturally curly or wavy, you might want to straighten it first for a more polished look.
Step 2: Apply Heat Protectant
Heat protectant spray is your best friend when it comes to flat iron curls. It helps prevent damage and keeps your hair looking healthy. Simply spray it evenly throughout your hair, focusing on the ends.
Step 3: Section Your Hair
Divide your hair into sections to make the curling process easier. This will also ensure that each section gets the attention it deserves. Use clips or hair ties to keep the sections separate.
Read also:Pinkvideochat
How to Curl Hair with Flat Iron: The Technique
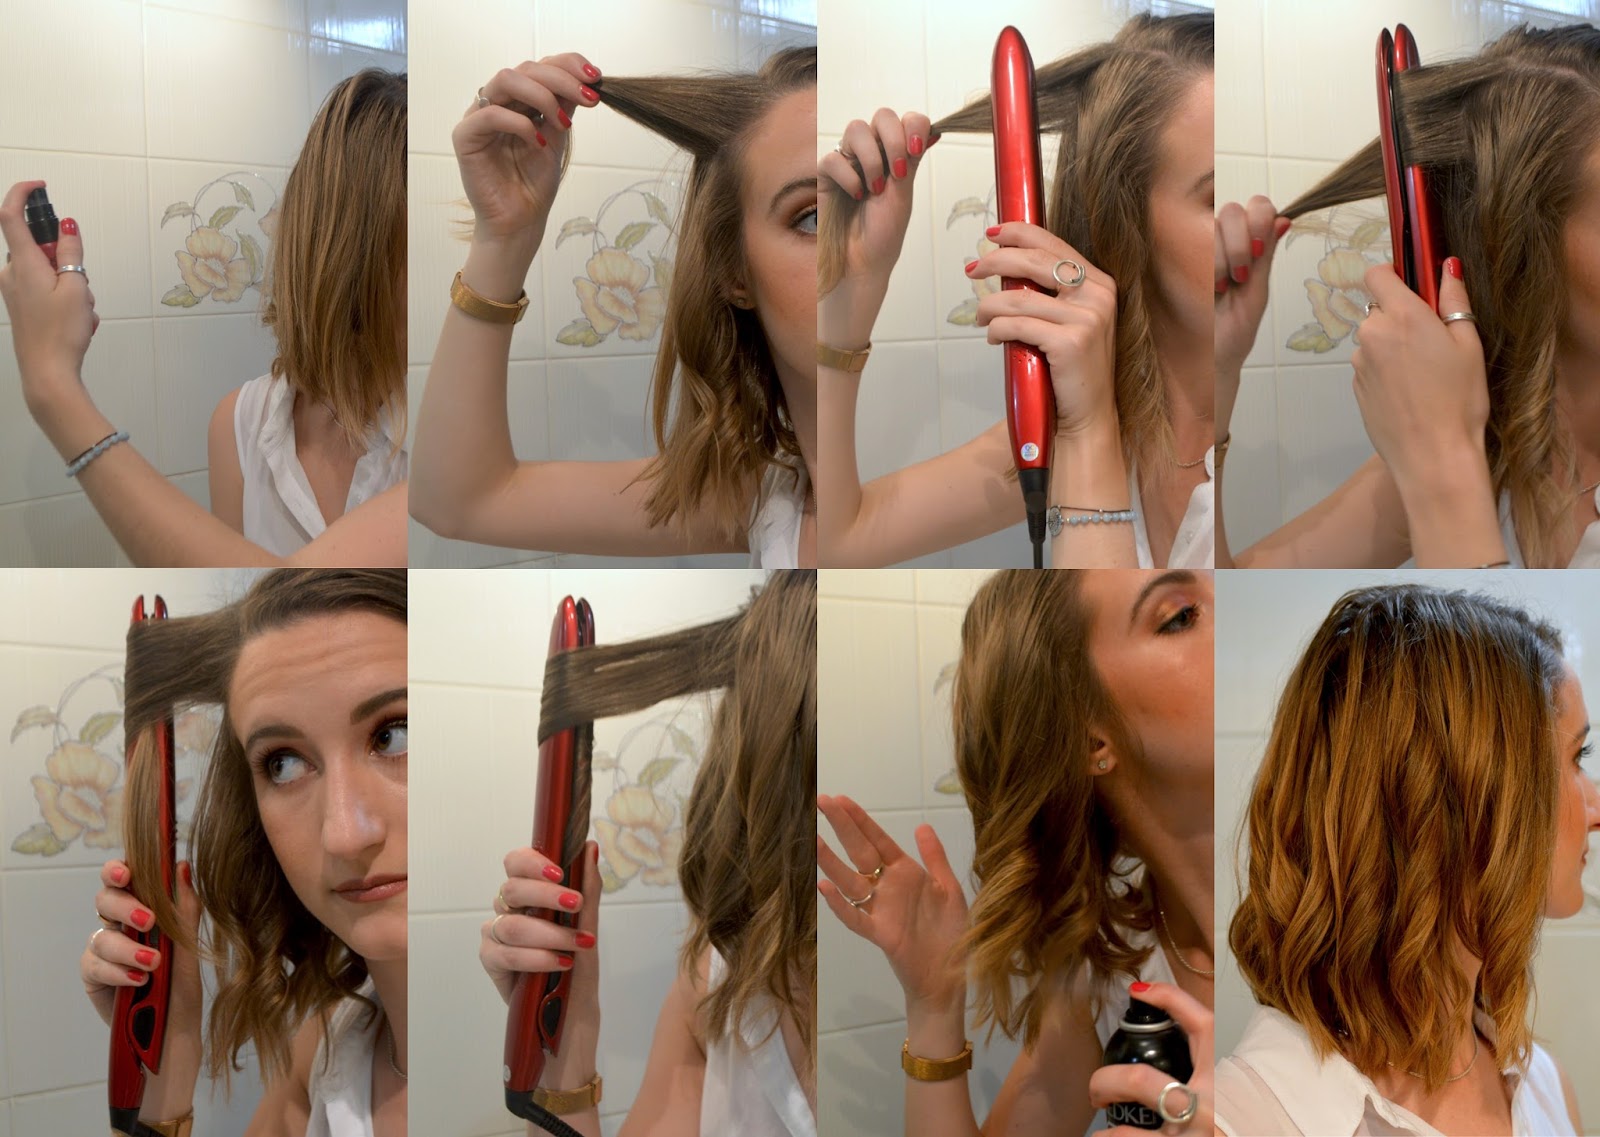
Now that your hair is prepped and ready, it's time to start curling. Here’s a step-by-step guide:
Step 1: Set the Temperature
Adjust the temperature of your flat iron based on your hair type. Fine hair typically requires lower temperatures (around 300°F), while thick or coarse hair may need higher temps (up to 400°F).
Step 2: Start with Small Sections
Take a small section of hair (about 1-2 inches wide) and clamp the flat iron at the root. Slowly glide the iron down to the ends, keeping the hair straight. This will help create a smooth base for your curls.
Step 3: Create the Curl
Once you reach the ends, twist the flat iron away from your face to create an outward curl. Hold it in place for a few seconds, then release. For inward curls, twist the iron towards your face instead.
Step 4: Repeat
Continue this process for each section of hair, working your way around your head. Remember to alternate the direction of the curls for a more natural look.
Tips for Perfect Curls
Here are a few tips to help you achieve flawless curls every time:
- Use a round brush to smooth out your hair before curling.
- Don’t rush the process. Take your time with each section to ensure even curls.
- Let your curls cool down before touching them. This will help them set properly.
- Use a light hairspray to hold your curls in place without weighing them down.
Common Mistakes to Avoid
Even the best techniques can go wrong if you’re not careful. Here are some common mistakes to avoid:
Mistake 1: Skipping Heat Protectant
Heat protectant is essential for preventing damage. Skipping it can lead to split ends and dry, brittle hair.
Mistake 2: Using Too Much Heat
High temperatures can damage your hair, especially if it’s fine or fragile. Always use the lowest temperature that still gives you the results you want.
Mistake 3: Touching Your Curls Too Soon
Touching your curls while they’re still hot can cause them to lose their shape. Let them cool down completely before running your fingers through them.
Styling Your Flat Iron Curls
Once you’ve curled your hair, it’s time to style it. Here are a few ideas:
Idea 1: Loose Waves
For a more relaxed look, run your fingers through your curls to break them up. This will give you soft, beachy waves that are perfect for casual occasions.
Idea 2: Tight Curls
If you want a more formal look, keep your curls intact and use a strong hairspray to hold them in place. This is great for weddings, parties, or any event where you want to look your best.
Idea 3: Half-Up, Half-Down
For a stylish yet practical option, try a half-up, half-down hairstyle. Gather the top section of your hair into a loose bun or ponytail, leaving the rest to flow freely.
Maintaining Your Curls
Keeping your curls looking fresh all day can be a challenge, but it’s not impossible. Here are some tips:
- Use a volumizing mousse or curl enhancer to boost your curls.
- Sleep on a silk pillowcase to prevent frizz and maintain your curls overnight.
- Reapply hairspray throughout the day as needed to keep your curls in place.
Best Flat Irons for Curling
Not all flat irons are ideal for curling. Here are some of the best options on the market:
Option 1: CHI Ceramic Flat Iron
This classic flat iron is loved by professionals and amateurs alike. Its ceramic plates provide even heat distribution, and its adjustable temperature settings make it perfect for all hair types.
Option 2: BaBylissPRO Nano Titanium Flat Iron
With its nano titanium plates, this flat iron delivers fast, efficient results. It’s great for creating both straight and curly styles.
Option 3: Hot Tools Professional Ceramic Flat Iron
This affordable option offers excellent performance for its price. Its ceramic plates and adjustable temperature settings make it a great choice for beginners.
Final Thoughts
Learning how to curl hair with flat iron is a skill that every hair enthusiast should master. Not only is it cost-effective, but it also gives you the freedom to experiment with different styles. Remember to prep your hair properly, use the right technique, and avoid common mistakes for the best results.
So, what are you waiting for? Grab your flat iron and start curling! And don’t forget to share your results with us in the comments below. We’d love to hear about your curling adventures and any tips you might have for fellow curl enthusiasts.
Table of Contents