Ever wondered how to tie a bow with ribbon like a pro? It’s simpler than you think, trust me. Whether you’re wrapping gifts, crafting bows for hair accessories, or just want to add a fancy touch to your DIY projects, learning this skill is a game-changer. So, buckle up because we’re about to dive deep into the art of ribbon tying!
Let’s face it—tying bows with ribbon can be tricky at first. But hey, who doesn’t love a good challenge? Plus, once you master it, you’ll feel unstoppable. Imagine those perfectly symmetrical loops and neat little knots that scream “I’m a crafting genius!”
In this guide, we’ll break down every step of the process, share some insider tips, and even sprinkle in a few tricks to make your bows look flawless. So grab your favorite ribbon, pour yourself a cup of coffee, and let’s get started!
Read also:Camilla Araujo Pron
Why Learning How to Tie a Bow with Ribbon Matters
Before we jump into the nitty-gritty, let’s talk about why mastering this skill is worth your time. Let’s be honest—everyone loves a beautifully wrapped present. And what makes a gift stand out more than an elegant bow? Trust me, people notice these details. It’s like the cherry on top of an already amazing dessert.
Plus, knowing how to tie a bow isn’t just about gifts. Think about all the other possibilities—hair bows, home decor, party decorations, and even fashion accessories. The opportunities are endless, and the best part? You don’t need any fancy tools or expensive supplies. Just a ribbon and your two hands.
Getting Started: What You Need
Alright, let’s talk supplies. To tie a bow with ribbon, you’ll need a few basic things:
- A ribbon of your choice (satin, grosgrain, or even fabric works)
- Scissors (optional, but helpful for trimming)
- A steady hand and a little patience
Pro tip: Choose a ribbon that’s wide enough for your project. If you’re wrapping a large gift, go for something bold and eye-catching. For smaller projects, a narrower ribbon might work better.
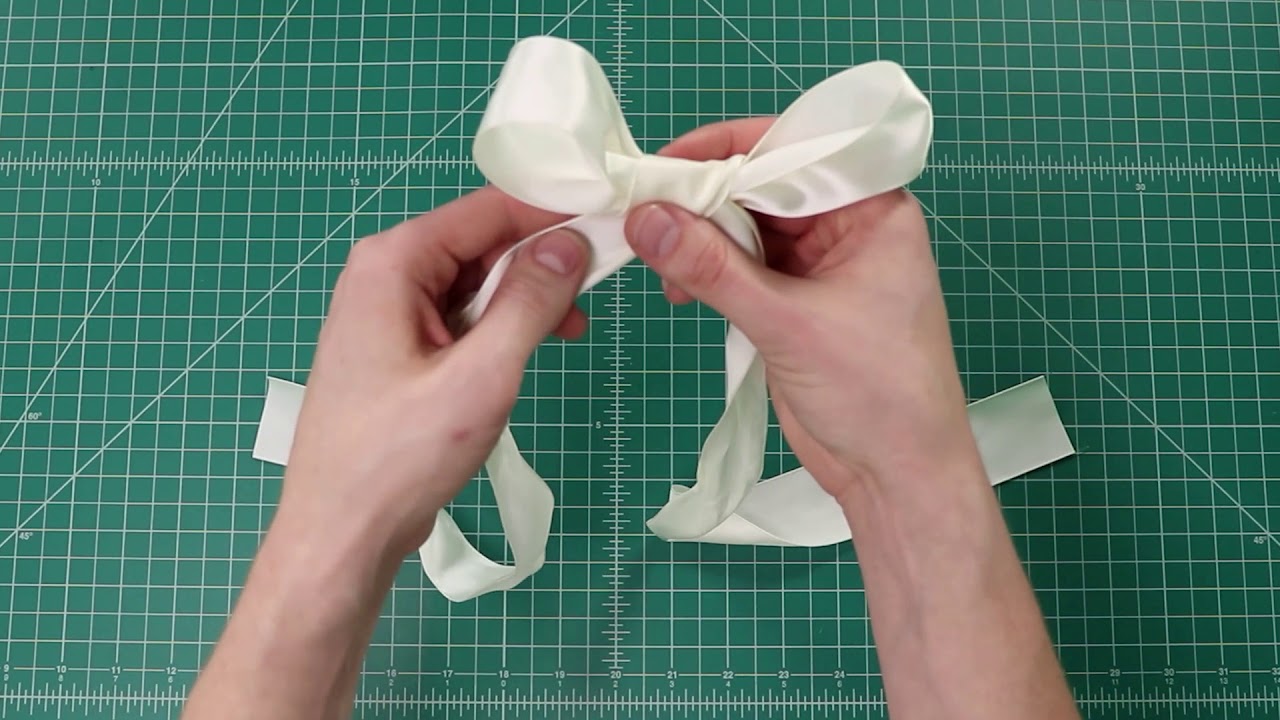
Step-by-Step Guide: How to Tie a Bow with Ribbon
Now that you’ve got everything ready, let’s dive into the actual tying process. Don’t worry—it’s easier than it looks.
Step 1: Measure Your Ribbon
First things first, measure your ribbon. You don’t want it too short or too long. A good rule of thumb is to cut a piece that’s about 2-3 times the length of the object you’re wrapping. This gives you enough room to play around without running out of ribbon halfway through.
Read also:Aswad Ayinde
Step 2: Create the First Loop
Take one end of the ribbon and form a loop. Hold it with your thumb and forefinger. This will be the base of your bow, so make sure it’s the size you want.
Step 3: Add the Second Loop
Now, take the other end of the ribbon and create a second loop. Make it the same size as the first one. This step is crucial for symmetry, so take your time to ensure both loops are equal.
Step 4: Tie the Knot
Once you’ve got your two loops, pinch them together and wrap the remaining ribbon around the middle. Then, tie a knot to secure everything in place. This is where the magic happens—your bow is starting to take shape!
Step 5: Fluff It Out
The final step is to fluff out your bow. Gently pull apart the loops to give it a fuller look. You can also adjust the tails if they’re uneven. And voilà—you’ve got yourself a beautiful bow!
Tips and Tricks for Perfect Bows Every Time
Now that you know the basics, here are a few tips to take your bow-tying skills to the next level:
- Use the right ribbon: Satin ribbons are great for smooth, polished bows, while grosgrain ribbons add texture and dimension.
- Practice makes perfect: Don’t get discouraged if your first few attempts aren’t perfect. Keep practicing, and you’ll see improvement in no time.
- Experiment with sizes: Try making bows in different sizes to see what works best for your project. Sometimes smaller bows can make a bigger impact.
Common Mistakes to Avoid
Even the best bow-tiers make mistakes sometimes. Here are a few pitfalls to watch out for:
- Cutting the ribbon too short
- Not securing the knot tightly enough
- Forgetting to fluff out the loops
Remember, practice and patience are key. Don’t rush the process, and you’ll end up with a bow that looks professional every time.
Advanced Techniques: Taking Your Bows to the Next Level
Once you’ve mastered the basics, it’s time to explore some advanced techniques. Here are a few ideas to try:
- Layered bows: Add depth and dimension by layering multiple bows on top of each other.
- Custom shapes: Experiment with different shapes, like heart-shaped or star-shaped bows.
- Adding embellishments: Use beads, buttons, or other decorations to give your bows a unique touch.
DIY Projects Featuring Ribbon Bows
Now that you know how to tie a bow with ribbon, let’s talk about some fun projects to try:
Project 1: Gift Wrapping
Nothing says “thoughtful” like a beautifully wrapped gift. Add a bow to your presents for an extra touch of elegance.
Project 2: Hair Accessories
Make your own hair bows using ribbon. They’re easy to create and can be customized to match any outfit.
Project 3: Home Decor
Use ribbon bows to decorate your home. Tie them onto wreaths, picture frames, or even furniture for a festive look.
Data and Statistics: The Power of Ribbon Crafts
Did you know that the crafting industry is worth billions of dollars? According to recent studies, ribbon crafts are among the most popular DIY projects worldwide. In fact, over 70% of crafters say they use ribbon in their projects regularly. That’s a lot of bows!
Not only is crafting with ribbon fun, but it’s also a great way to save money. Instead of buying pre-made bows, you can make your own for a fraction of the cost. Plus, you get the satisfaction of knowing you created something with your own hands.
Expert Advice: Tips from Professional Crafters
We reached out to a few professional crafters to get their take on bow-tying. Here’s what they had to say:
"The key to a great bow is consistency. Make sure all your loops are the same size, and don’t be afraid to experiment with different textures and colors." – Jane D., Professional Crafter
"Practice is everything. The more you tie bows, the better you’ll get. And don’t forget to have fun with it!" – Sarah M., DIY Enthusiast
Conclusion: Your Journey to Bow-Tying Mastery
And there you have it—everything you need to know about how to tie a bow with ribbon. From the basics to advanced techniques, we’ve covered it all. Remember, practice makes perfect, so don’t be afraid to experiment and try new things.
Now it’s your turn to take action. Grab your ribbon, try out the steps we’ve outlined, and share your creations with the world. And if you loved this guide, don’t forget to leave a comment or check out our other articles for more crafting inspiration.
Table of Contents
- Why Learning How to Tie a Bow with Ribbon Matters
- Getting Started: What You Need
- Step-by-Step Guide: How to Tie a Bow with Ribbon
- Tips and Tricks for Perfect Bows Every Time
- Common Mistakes to Avoid
- Advanced Techniques: Taking Your Bows to the Next Level
- DIY Projects Featuring Ribbon Bows
- Data and Statistics: The Power of Ribbon Crafts
- Expert Advice: Tips from Professional Crafters
- Conclusion: Your Journey to Bow-Tying Mastery