So, you’ve decided to dive into the world of art and learn how to draw a bow. let me tell you, this is one of those skills that can take your illustrations from amateur to epic. Whether you’re sketching for fun or working on a detailed masterpiece, mastering the art of drawing a bow opens up endless possibilities. so grab your pencil and let’s get started. oh, and don’t worry if your first attempts look a bit wonky. we’ve all been there!
Now, before we jump into the nitty-gritty details, it’s important to understand that drawing a bow isn’t just about replicating its shape. it’s about capturing the essence of the object and making it look realistic. from the curve of the limbs to the tension in the string, every detail matters. trust me, once you get the hang of it, you’ll be drawing bows like a pro in no time.
But why stop at just learning how to draw a bow? think about it – you can incorporate it into larger scenes, like an archer in action or a fantasy forest setting. the possibilities are endless. and who knows? maybe this little hobby will turn into something big. so let’s roll up our sleeves and dive right in.
Read also:Mms Video
Table of Contents
- Tools You Need to Draw a Bow
- Breaking Down the Bow into Basic Shapes
- Step-by-Step Guide to Drawing a Bow
- Different Styles of Bows and How to Draw Them
- Pro Tips for Perfecting Your Bow Drawings
- Common Mistakes to Avoid
- How to Draw Fantasy Bows
- Practicing Your Skills with Real-Life References
- Using Digital Tools to Draw a Bow
- Wrapping It Up: Keep Practicing!
Tools You Need to Draw a Bow
before we start, you need the right tools for the job. no, i’m not talking about some fancy high-tech gadgets. just the basics will do. here’s what you’ll need:
- A good quality pencil – i recommend starting with a 2B or HB for sketching.
- An eraser – trust me, you’ll need this to fix those little mistakes.
- A ruler – helps keep your lines straight and your proportions accurate.
- A sketchbook – something where you can practice and experiment without worrying about messing up.
- Colored pencils or markers (optional) – if you want to add some color to your drawings.
and that’s it! no need to break the bank on expensive supplies. the key is to practice consistently and let your skills improve over time. oh, and don’t forget to have fun while you’re at it!
Breaking Down the Bow into Basic Shapes
one of the easiest ways to learn how to draw a bow is by breaking it down into basic shapes. this technique is especially helpful for beginners who might find the overall shape of a bow intimidating. so, what are we looking at here?
start by sketching an elongated oval for the main body of the bow. this will form the curved limbs. then, add two straight lines at the ends to represent the tips of the bow. finally, draw a thin line connecting the two ends – this will be your string. simple, right?
Why Basic Shapes Matter
using basic shapes helps you understand the structure of the bow before adding details. it’s like building a house – you need a strong foundation before you can start decorating. once you’ve got the basic shape down, you can refine it and add those all-important details.
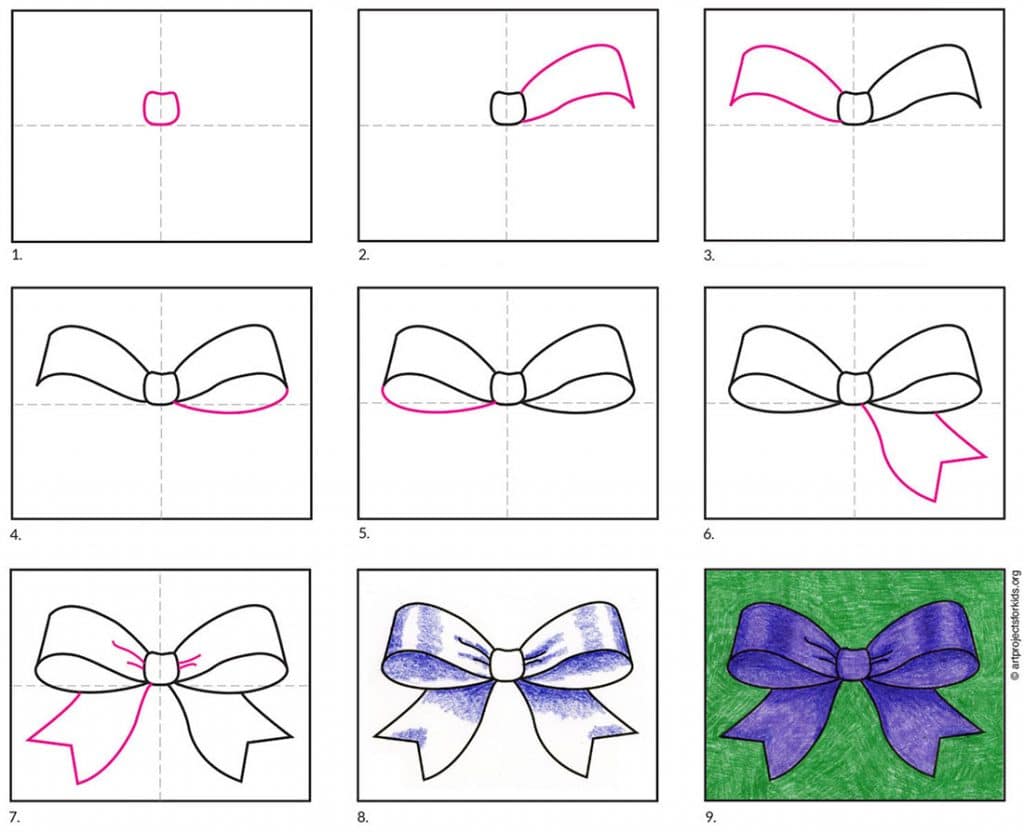
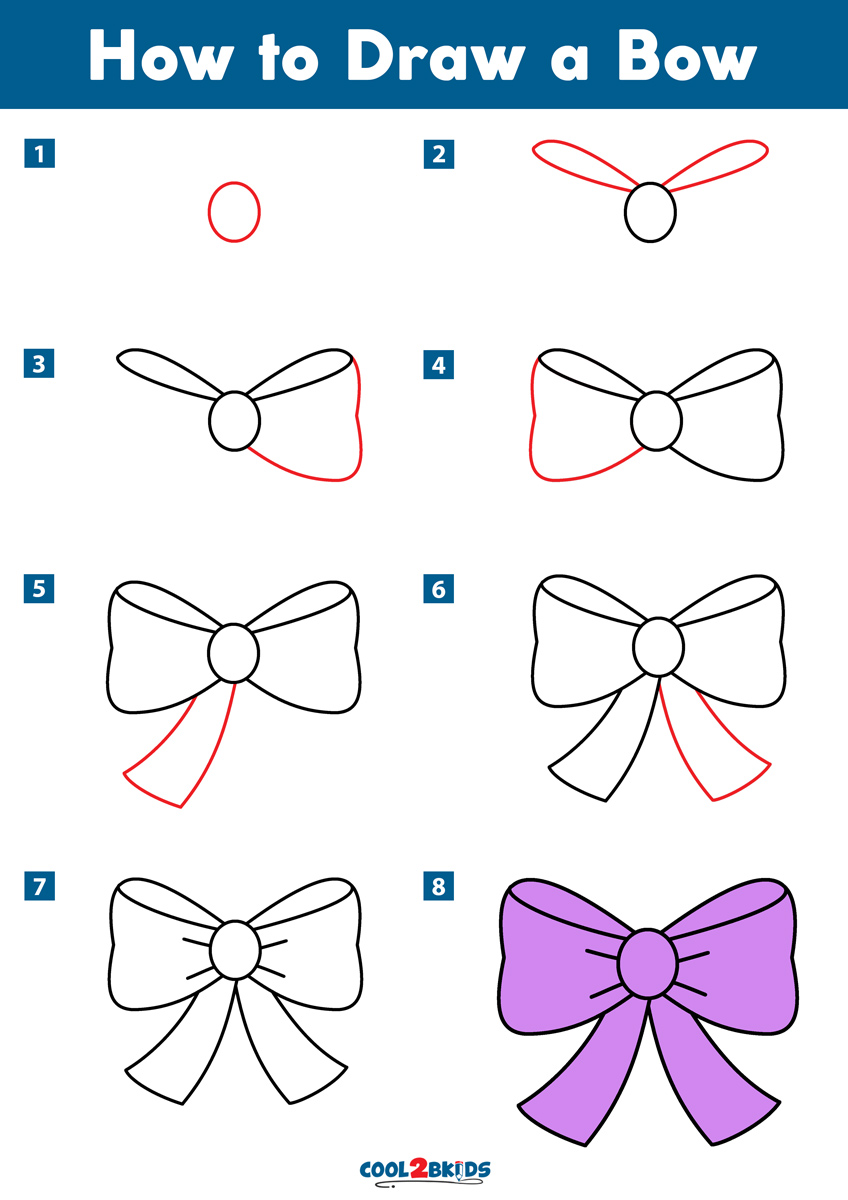
Step-by-Step Guide to Drawing a Bow
ready to put pencil to paper? here’s a step-by-step guide to help you draw a bow like a pro:
Read also:Indian Leaked Mms Videos
Step 1: Sketch the Basic Shape
begin by lightly sketching the oval shape for the bow’s limbs. make sure it’s curved and symmetrical. this will be the foundation of your drawing.
Step 2: Add the Tips
next, extend two straight lines from the ends of the oval. these will form the tips of the bow. keep them parallel and of equal length for balance.
Step 3: Draw the String
connect the two tips with a thin line. this will be your bowstring. remember, the string should be taut, so make it as straight as possible.
Step 4: Refine the Details
now it’s time to add some personality to your bow. sketch in the grooves and ridges along the limbs, and maybe even add a grip for the archer. don’t forget to erase any unnecessary lines from your initial sketch.
Step 5: Shade and Color
finally, add some shading to give your bow depth and dimension. if you’re feeling adventurous, break out the colored pencils and bring your bow to life with vibrant colors.
and there you have it – your very own bow drawing!
Different Styles of Bows and How to Draw Them
not all bows are created equal. from traditional longbows to modern compound bows, each type has its own unique characteristics. here’s a quick rundown of some popular bow styles and how to draw them:
- Longbow: simple and elegant, the longbow is all about clean lines and symmetry. focus on getting the curve of the limbs just right.
- Recurve Bow: this one’s a bit more complex, with the tips of the limbs curving back towards the archer. pay attention to the angles and proportions.
- Compound Bow: packed with modern technology, the compound bow has a more mechanical appearance. include details like the pulleys and cables in your drawing.
each style offers its own challenges and rewards. experiment with different types to find your favorite!
Pro Tips for Perfecting Your Bow Drawings
want to take your bow drawings to the next level? here are a few pro tips to help you refine your skills:
- study real-life bows to understand their structure and proportions.
- practice sketching from different angles to get a better grasp of the bow’s form.
- experiment with shading techniques to add depth and dimension to your drawings.
- don’t be afraid to make mistakes – they’re all part of the learning process.
remember, practice makes perfect. the more you draw, the better you’ll get. so keep at it!
Common Mistakes to Avoid
even the best artists make mistakes. here are a few common pitfalls to watch out for when learning how to draw a bow:
- making the bow too symmetrical – real bows often have slight imperfections that add character.
- ignoring proportions – make sure the limbs, tips, and string are all in proportion to each other.
- overcomplicating the details – sometimes less is more. focus on the essentials first.
by avoiding these mistakes, you’ll be well on your way to creating realistic and captivating bow drawings.
How to Draw Fantasy Bows
if you’re into fantasy art, drawing fantasy bows can be a lot of fun. these bows often feature intricate designs and magical elements. here’s how you can create your own:
start with the basic shape of a traditional bow, then add your own twists. think about incorporating elements like glowing runes, flowing ribbons, or even dragon scales. the sky’s the limit when it comes to fantasy bows!
Adding Magical Elements
to give your fantasy bow that extra sparkle, consider adding some magical effects. use shading to create a glowing aura around the bow, or sketch in wisps of smoke or light. these small details can make a big difference in bringing your fantasy bow to life.
Practicing Your Skills with Real-Life References
nothing beats practice when it comes to improving your drawing skills. seek out real-life references, whether it’s photos of bows or visiting an archery range. observing real bows will give you a deeper understanding of their structure and how they work.
and don’t forget to sketch regularly. even if it’s just for a few minutes a day, consistent practice will help you improve faster than you think.
Using Digital Tools to Draw a Bow
if you’re more into digital art, there are plenty of tools available to help you draw a bow. programs like adobe illustrator or procreate offer a wide range of brushes and effects to bring your drawings to life. experiment with different settings to find what works best for you.
digital tools also allow for easy editing, so you can refine your drawings without having to start over. it’s like having an unlimited eraser at your fingertips!
Wrapping It Up: Keep Practicing!
so there you have it – everything you need to know about how to draw a bow. from basic shapes to advanced techniques, the key is to keep practicing and having fun. remember, every great artist started as a beginner. so don’t be discouraged if your first attempts don’t turn out exactly as you hoped.
leave a comment below to let me know how your bow-drawing journey is going. and don’t forget to share this article with your fellow art enthusiasts. the more we learn together, the better we’ll all become!
happy drawing, and see you in the next one!